Delicious Roasted Garlic Hummus Bowls: A Healthy and Flavorful Meal

WANT TO SAVE THIS RECIPE?

Introduction

Hummus has earned its place as a staple in many kitchens around the world, celebrated for its versatility and nutritional benefits. This creamy, savory spread made primarily from chickpeas is more than just a dip; it’s a canvas for flavors, a protein-packed addition to meals, and a healthy alternative to heavier spreads. Among the myriad of hummus variations, roasted garlic hummus stands out for its rich, aromatic flavor profile that elevates this classic dish to new heights.

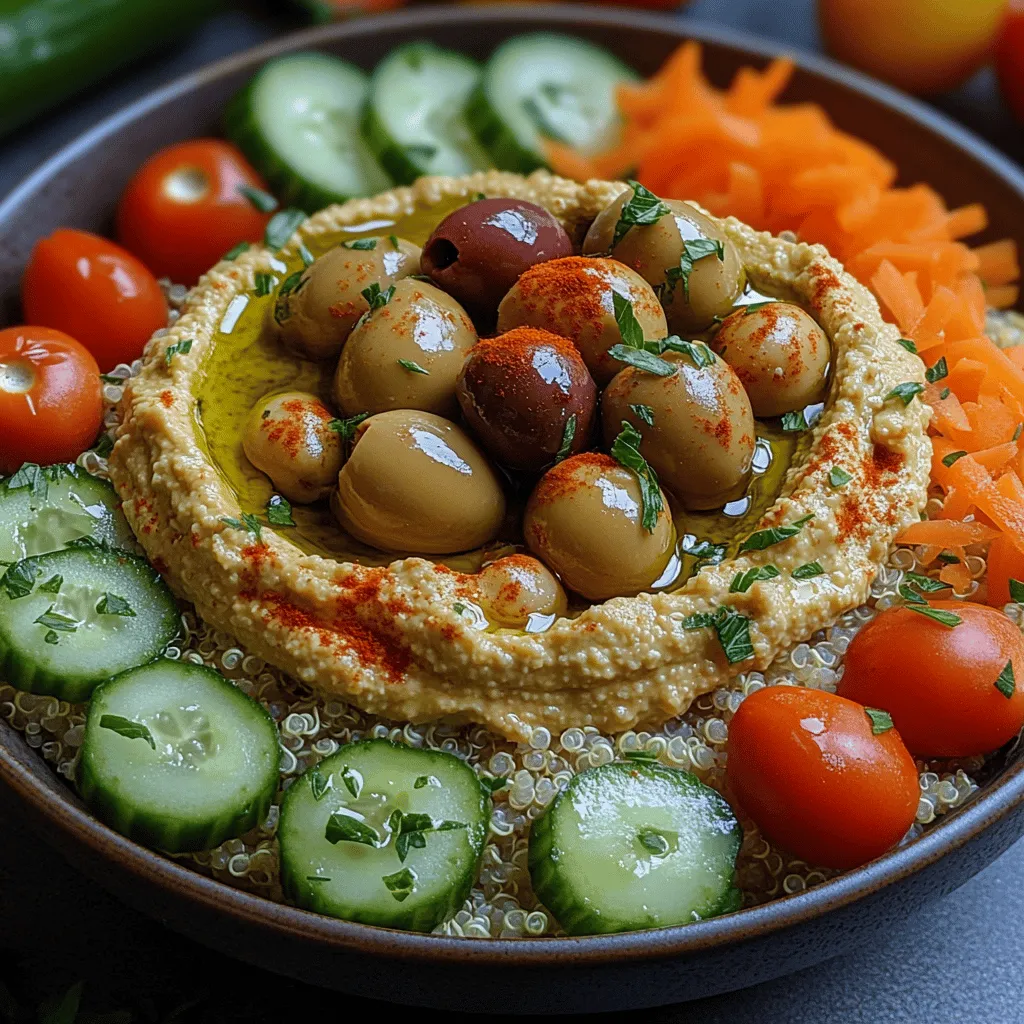
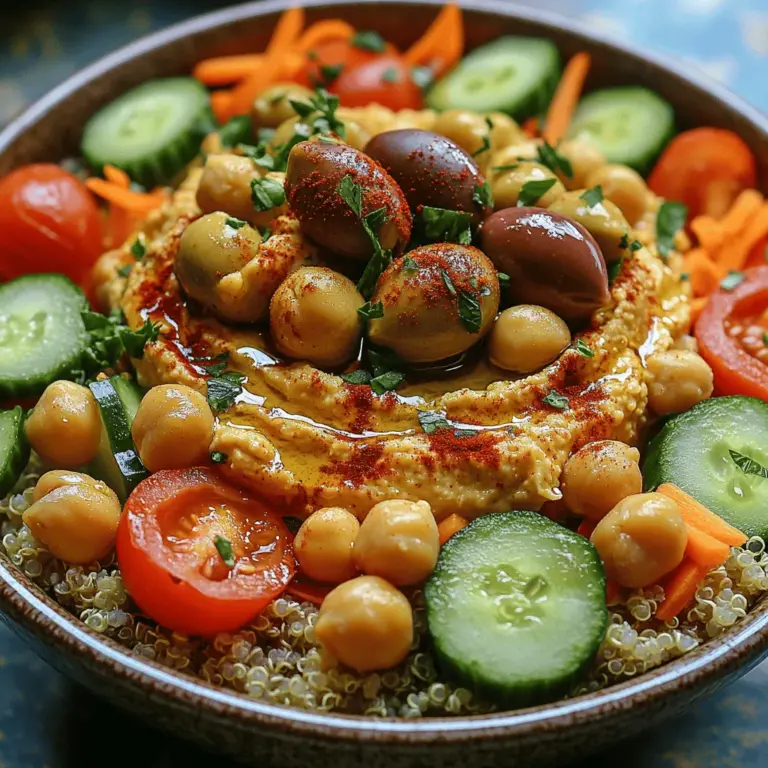
In this article, we will delve into the world of roasted garlic hummus bowls, exploring how this delightful recipe combines wholesome ingredients into a satisfying meal that not only pleases the palate but also nourishes the body. From the creamy texture of the hummus to the enticing aroma of roasted garlic, each bite promises a burst of flavor that makes healthy eating enjoyable.

The Benefits of Hummus

Hummus, primarily made from chickpeas, is a nutritional powerhouse. Chickpeas are a fantastic source of plant-based protein, providing essential amino acids that support muscle growth and repair. They are high in fiber, which promotes digestive health and helps maintain a steady blood sugar level, making hummus a great option for those looking to manage their weight or improve their energy levels.

Furthermore, chickpeas are rich in vitamins and minerals, including folate, manganese, and iron, contributing to overall health and well-being. Incorporating hummus into your diet can support heart health and reduce the risk of chronic diseases, making it a smart addition to any meal plan.

Roasted garlic, the star ingredient in our recipe, brings a host of health benefits to the table. Garlic is renowned for its potential immune-boosting properties, attributed to its high concentration of allicin, a compound known for its antimicrobial and anti-inflammatory effects. Regular consumption of garlic has been linked to improved heart health, better cholesterol levels, and even enhanced cognitive function.

One of the key advantages of making hummus at home is the ability to control the ingredients. Store-bought hummus can often contain preservatives, excessive sodium, and unhealthy oils, diminishing its health benefits. By preparing hummus from scratch, you can incorporate fresh ingredients and adjust flavors to suit your preferences, ensuring a nourishing and delicious outcome.

Ingredients Overview

Creating the perfect roasted garlic hummus requires a harmonious blend of quality ingredients. Each component plays a crucial role in achieving the desired flavor and texture:

1. Chickpeas: The backbone of hummus, chickpeas can be used dried or canned. Dried chickpeas require soaking and cooking, which can enhance their flavor and texture. They are also less processed than canned varieties and often contain fewer additives. On the other hand, canned chickpeas are incredibly convenient, saving time without sacrificing too much in flavor or nutrition. The choice between the two depends on your schedule and preference.

2. Tahini: This sesame seed paste adds a creamy texture and a nutty flavor to the hummus. It’s a source of healthy fats, protein, and essential vitamins such as B vitamins, magnesium, and iron. When selecting tahini, opt for high-quality, pure tahini without added oils or preservatives to ensure a clean taste in your hummus.

3. Olive Oil: A staple in Mediterranean cuisine, olive oil not only enriches the hummus with its fruity flavor but also contributes to its smooth consistency. Rich in monounsaturated fats, olive oil is known for its heart-healthy benefits, including reducing inflammation and lowering bad cholesterol levels. Using high-quality extra virgin olive oil will enhance both the taste and nutritional profile of your hummus.

4. Fresh Ingredients: Fresh lemon juice adds brightness and acidity, balancing the rich flavors of the tahini and olive oil. It also provides a vitamin C boost, supporting immune health. Fresh garlic, roasted to perfection, transforms into a sweet and mellow flavor that complements the chickpeas beautifully. Adding spices like cumin or paprika can elevate the flavor profile, giving your hummus a unique twist.

Preparing Roasted Garlic

Roasting garlic is a simple yet transformative process that enhances its natural sweetness and mellows its pungency. Here’s how to do it:

1. Select Your Garlic: Choose a firm head of garlic with dry, papery skin and no signs of sprouting.

2. Preheat the Oven: Set your oven to 400°F (200°C).

3. Prepare the Garlic: Slice off the top of the garlic head, exposing the individual cloves. Drizzle with olive oil, ensuring each clove is coated. Wrap the garlic head in aluminum foil to trap the steam, which will help roast the cloves evenly.

4. Roast: Place the wrapped garlic in the preheated oven and roast for about 30-35 minutes, or until the cloves are soft and caramelized. You can check for doneness by squeezing the garlic; it should be tender and easily squeezed out of its skin.

5. Cool and Store: Once roasted, let the garlic cool slightly before handling. You can use it immediately in your hummus or store the roasted cloves in an airtight container in the refrigerator for up to a week.

The roasting process transforms garlic, resulting in a complex flavor that adds depth to your hummus. The sweet, creamy cloves can also be used in various dishes, such as pasta, spreads, or dressings, making them a versatile ingredient to keep on hand.

Making the Perfect Hummus

Now that you have your roasted garlic ready, it’s time to create the perfect roasted garlic hummus. Follow these detailed steps to ensure a creamy, flavorful result:

1. Gather Your Ingredients: For the hummus, you will need:

– 1 cup cooked chickpeas (or 1 can, rinsed and drained)

– 1/4 cup tahini

– 1/4 cup freshly squeezed lemon juice

– 1-2 tablespoons roasted garlic (adjust to taste)

– 2-3 tablespoons olive oil

– Salt to taste

– Water as needed

2. Blend the Ingredients: In a food processor, combine the cooked chickpeas, tahini, lemon juice, and roasted garlic. Blend until the mixture is smooth and creamy, scraping down the sides as needed.

3. Adjust Consistency: To achieve the ideal hummus consistency, gradually add water while blending. Start with a tablespoon at a time until you reach your desired creaminess.

4. Incorporate Olive Oil: Once blended, drizzle in the olive oil while the food processor is running. This emulsifies the oil into the hummus, giving it a velvety texture.

5. Season to Taste: Finally, add salt to taste. You can also incorporate spices like cumin or smoked paprika for added flavor. Blend again until well mixed.

The result should be a smooth, creamy hummus with a delightful roasted garlic essence. Adjust the flavors as needed, and if you prefer a bit more acidity, a splash of extra lemon juice can brighten the dish.

By following these steps, you’ll create a roasted garlic hummus that’s not just a dip, but a flavorful, nutritious base for a variety of meals.

In the next section of this article, we will explore how to assemble your roasted garlic hummus bowls with wholesome toppings and sides that complement the rich flavors of the hummus, making it a complete meal perfect for any occasion. Stay tuned as we continue to elevate this delicious recipe!

Hummus has earned its place as a staple in many kitchens around the world, celebrated for its versatility and nutritional benefits. This creamy, savory spread made primarily from chickpeas is more than just a dip; it's a canvas for flavors, a protein-packed addition to meals, and a healthy alternative to heavier spreads. Among the myriad of hummus variations, <strong>roasted garlic hummus</strong> stands out for its rich, aromatic flavor profile that elevates this classic dish to new heights.” /></p>
</p>
<h3>Suggestions for Seasoning Adjustments Based on Personal Preference</h3>
</p>
<p>One of the best aspects of roasted garlic hummus bowls is their versatility. While the base recipe provides a delightful balance of flavors, you can easily adjust seasonings to suit your taste. Here are some ideas:</p>
</p>
<p>1. <strong>Herbs and Spices</strong>: Fresh herbs like parsley, cilantro, or basil can elevate the dish. A sprinkle of smoked paprika or cayenne pepper adds a hint of warmth and complexity. For a Mediterranean flavor, consider adding oregano or thyme.</p>
</p>
<p>2. <strong>Citrus Zest</strong>: A bit of lemon or lime zest can brighten the flavors of your hummus. If you prefer a sweeter touch, try a hint of orange zest.</p>
</p>
<p>3. <strong>Heat</strong>: If you enjoy spicy food, adding a dash of sriracha or a pinch of red chili flakes can give your hummus a delightful kick. Alternatively, for a milder version, reduce the garlic quantity or opt for roasted garlic instead.</p>
</p>
<p>4. <strong>Texture</strong>: For a creamier hummus, increase the tahini or olive oil. If you prefer a chunkier texture, you can blend less or fold in some whole chickpeas after blending.</p>
</p>
<p>The beauty of this recipe lies in its adaptability. Feel free to experiment with these seasoning options until you find the perfect blend that excites your palate.</p>
</p>
<h3>Cooking Quinoa or Brown Rice</h3>
</p>
<p>When it comes to the base for your hummus bowls, quinoa and brown rice are both excellent choices. Each grain has its own unique nutritional profile and cooking method, making them suitable for various dietary needs.</p>
</p>
<h4>Nutritional Differences</h4>
</p>
<p>– <strong>Quinoa</strong>: This ancient grain is a complete protein, meaning it contains all nine essential amino acids, making it a fantastic option for vegans and vegetarians. Quinoa is also higher in fiber and lower on the glycemic index compared to brown rice, which can be beneficial for blood sugar control.</p>
</p>
<p>– <strong>Brown Rice</strong>: While not a complete protein, brown rice is still a nutritious whole grain. It is rich in manganese, selenium, and provides a good source of carbohydrates for energy. Brown rice has a slightly nuttier flavor and chewier texture than quinoa, which can add depth to your bowls.</p>
</p>
<h4>Cooking Instructions</h4>
</p>
<p><strong>Cooking Quinoa</strong>:</p>
<p>1. Rinse 1 cup of quinoa under cold water to remove its natural coating, called saponin, which can taste bitter.</p>
<p>2. In a medium saucepan, combine the rinsed quinoa with 2 cups of water and a pinch of salt.</p>
<p>3. Bring the mixture to a boil over medium-high heat. Once boiling, reduce the heat to low, cover, and let it simmer for about 15 minutes or until the water is absorbed.</p>
<p>4. Remove from heat and let it sit for 5 minutes, then fluff with a fork. This will give you light, fluffy quinoa, perfect for your hummus bowls.</p>
</p>
<p><strong>Cooking Brown Rice</strong>:</p>
<p>1. Rinse 1 cup of brown rice under cold water to remove excess starch.</p>
<p>2. Combine the rinsed rice with 2.5 cups of water and a pinch of salt in a saucepan.</p>
<p>3. Bring to a boil, then reduce the heat to low, cover, and simmer for 40-45 minutes or until the water is absorbed.</p>
<p>4. Allow it to rest for 10 minutes off the heat, then fluff with a fork. Cooking brown rice longer provides a softer texture, which complements the creaminess of the hummus.</p>
</p>
<p>Both grains can be made in advance, making them great options for meal prep. They provide a nutritious and hearty base that pairs wonderfully with the creamy roasted garlic hummus and vibrant toppings.</p>
</p>
<h3>Assembling the Hummus Bowls</h3>
</p>
<p>Once your roasted garlic hummus and chosen grain are ready, it’s time to assemble your bowls. The key to a stunning and flavorful hummus bowl lies in its presentation and the balance of flavors.</p>
</p>
<h4>Step-by-Step Guide for Assembling the Bowls</h4>
</p>
<p>1. <strong>Start with the Base</strong>: Place a generous scoop of cooked quinoa or brown rice at the bottom of your bowl. This acts as the foundation for your meal and should take up about one-third of the bowl.</p>
</p>
<p>2. <strong>Add the Hummus</strong>: Next, add a generous dollop of roasted garlic hummus on top of the base. Use the back of a spoon to create a well in the center of the hummus, which not only looks appealing but also allows for the addition of toppings.</p>
</p>
<p>3. <strong>Layer in the Toppings</strong>: Choose a variety of colorful toppings that contrast in flavor and texture. Here are some suggestions:</p>
<p>– <strong>Vegetables</strong>: Roasted bell peppers, cherry tomatoes, diced cucumber, or shredded carrots provide freshness and crunch.</p>
<p>– <strong>Proteins</strong>: Add some chickpeas, grilled chicken, or feta cheese for added protein.</p>
<p>– <strong>Nuts and Seeds</strong>: A sprinkle of toasted pine nuts or sunflower seeds can add a delightful crunch.</p>
<p>– <strong>Greens</strong>: Fresh spinach, arugula, or baby kale can introduce a peppery flavor and vibrant color.</p>
</p>
<p>4. <strong>Finish with a Drizzle</strong>: A drizzle of high-quality olive oil or a sprinkle of lemon juice over the top can enhance the flavors and bring the dish together.</p>
</p>
<p>5. <strong>Garnish</strong>: Finally, a sprinkle of fresh herbs or microgreens can add a beautiful finishing touch.</p>
</p>
<h4>Importance of Arrangement</h4>
</p>
<p>Arranging the ingredients in an aesthetically pleasing way not only enhances the visual appeal of your dish but can also elevate the overall eating experience. Each bite should offer a mix of flavors and textures, making each mouthful surprising and delightful. Customizing your bowls based on dietary preferences or seasonal availability allows for a truly personalized dish.</p>
</p>
<h3>Nutritional Information</h3>
</p>
<p>Understanding the nutritional content of your roasted garlic hummus bowls can help you appreciate the health benefits they offer. Here’s a general breakdown per serving (using ½ cup of quinoa, ⅓ cup of hummus, and various vegetables):</p>
</p>
<p>– <strong>Calories</strong>: Approximately 400-500 calories, depending on the toppings.</p>
<p>– <strong>Protein</strong>: 15-20 grams (from quinoa, hummus, and optional toppings).</p>
<p>– <strong>Fiber</strong>: 10-12 grams (from quinoa, chickpeas, and vegetables).</p>
<p>– <strong>Healthy Fats</strong>: 10-15 grams (from tahini in the hummus and olive oil).</p>
<p>– <strong>Vitamins and Minerals</strong>: Rich in Vitamin A, Vitamin C, iron, and magnesium.</p>
</p>
<p>Each component of the bowl contributes to a balanced meal. The combination of healthy fats, fiber, protein, and vitamins ensures that you’re not only satisfied but also nourished.</p>
</p>
<h3>Variations and Customizations</h3>
</p>
<p>To keep your roasted garlic hummus bowls exciting, consider exploring various ingredient options based on dietary preferences or seasonal availability.</p>
</p>
<p>– <strong>Alternative Ingredients</strong>: For a gluten-free option, both quinoa and rice are great choices. If you’re looking for a low-carb alternative, you can substitute grains with spiralized zucchini or cauliflower rice.</p>
</p>
<p>– <strong>Seasonal Vegetables</strong>: Incorporate seasonal produce to keep your bowls fresh and vibrant throughout the year. In spring, try adding asparagus or peas; during summer, opt for grilled corn or zucchini; in autumn, roasted sweet potatoes are a delicious addition; and in winter, root vegetables like beets or parsnips can add warmth and sweetness.</p>
</p>
<p>– <strong>Flavor Variations for Hummus</strong>: Don’t hesitate to experiment with the hummus itself. Consider blending in roasted red peppers for a sweet and smoky twist, or try adding fresh herbs like dill or basil for a refreshing taste. For a spicy kick, blend in some jalapeños or chipotle peppers.</p>
</p>
<h3>Serving Suggestions</h3>
</p>
<p>Roasted garlic hummus bowls are incredibly versatile and can be served in numerous ways, making them perfect for various occasions:</p>
</p>
<p>– <strong>Meal Prep</strong>: These bowls can be prepared in advance and stored in the refrigerator for quick lunches or dinners throughout the week. Just keep the hummus separate until you’re ready to eat to maintain freshness.</p>
</p>
<p>– <strong>Family Dinners</strong>: Serve a large platter of roasted garlic hummus alongside bowls of toppings and grains, allowing everyone to build their own customized bowls. This interactive dining experience is not only fun but encourages creativity.</p>
</p>
<p>– <strong>Gatherings</strong>: For gatherings, consider serving individual bowls or a buffet-style setup. You can pair the hummus bowls with a refreshing beverage like iced tea, lemonade, or even a light white wine, which complements the flavors of the dish beautifully.</p>
</p>
<h3>Conclusion</h3>
</p>
<p>Creating and enjoying roasted garlic hummus bowls is a rewarding culinary experience that is as nutritious as it is delicious. The combination of creamy hummus, hearty grains, and vibrant toppings offers a multitude of flavors, textures, and health benefits that make this dish a staple in any kitchen.</p>
</p>
<p>Whether you choose to stick to the classic ingredients or explore your own variations, these bowls are a testament to the joys of wholesome cooking. They invite you to experiment, be creative, and find satisfaction in preparing meals at home that nourish both body and soul. So gather your favorite ingredients, get cooking, and relish in the delightful experience of crafting your own roasted garlic hummus bowls.</p>
</div>

Hummus has earned its place as a staple in many kitchens around the world, celebrated for its versatility and nutritional benefits. This creamy, savory spread made primarily from chickpeas is more than just a dip; it's a canvas for flavors, a protein-packed addition to meals, and a healthy alternative to heavier spreads. Among the myriad of hummus variations, roasted garlic hummus stands out for its rich, aromatic flavor profile that elevates this classic dish to new heights.

Roasted Garlic Hummus Bowls

Discover the delicious world of roasted garlic hummus bowls, a nutritious and satisfying meal option perfect for any occasion. This creamy hummus, enriched with roasted garlic, offers a rich flavor and is packed with plant-based protein and fiber. Learn how to easily prepare this dish from scratch, control your ingredients, and personalize your bowls with colorful toppings like fresh veggies, proteins, and herbs. Embrace healthy eating while enjoying vibrant, customizable meals!

Ingredients
  

For the Roasted Garlic Hummus:

1 cup dried chickpeas (or 2 cans of chickpeas, drained and rinsed)

1 whole bulb of garlic

1/4 cup tahini

1/4 cup extra virgin olive oil, plus more for drizzling

2 tablespoons freshly squeezed lemon juice

1 teaspoon ground cumin

Salt to taste

1/4 to 1/2 cup water (depending on desired consistency)

Freshly ground black pepper to taste

For the Bowls:

2 cups cooked quinoa or brown rice

1 cucumber, diced

1 cup cherry tomatoes, halved

1 cup shredded carrots

1/2 cup pitted Kalamata olives, sliced

1/4 cup fresh parsley or cilantro, chopped

1 teaspoon smoked paprika (for garnish)

Optional toppings: feta cheese, sliced avocado, or sesame seeds

Instructions
 

Roast the Garlic: Preheat your oven to 400°F (200°C). Slice the top off the bulb of garlic to expose the cloves. Drizzle with olive oil and wrap it in foil. Roast for about 30-40 minutes, until the cloves are soft and golden brown. Allow to cool slightly before using.

    Cook the Chickpeas (if using dried): If using dried chickpeas, soak them overnight in plenty of water. Drain and rinse, then cook in a pot of water for about 1-1.5 hours until tender. Drain, and set aside.

      Blend the Hummus: In a food processor, combine the chickpeas, roasted garlic cloves (squeeze them out of their skins), tahini, olive oil, lemon juice, cumin, salt, and black pepper. Blend until smooth. Add water gradually until you reach your desired consistency. Taste and adjust the seasoning as needed.

        Prepare the Bowls: Cook quinoa or brown rice according to package instructions. Once done, fluff with a fork and season lightly with salt.

          Assemble the Bowls: Divide the quinoa or rice among 4 bowls. Add a generous dollop of roasted garlic hummus in the center of each bowl. Arrange diced cucumbers, cherry tomatoes, shredded carrots, and olives around the hummus.

            Garnish: Sprinkle chopped parsley or cilantro on top and drizzle with extra olive oil. Add a sprinkle of smoked paprika for color and flavor. Incorporate optional toppings like crumbled feta or sliced avocado if desired.

              Serve & Enjoy: Serve the bowls immediately and enjoy this healthy and satisfying meal!

                Prep Time, Total Time, Servings: 15 minutes | 1 hour | 4 servings

                  WANT TO SAVE THIS RECIPE?

                  Leave a Comment

                  Recipe Rating