Introduction
As the warm sun begins to shine and outdoor gatherings fill our calendars, finding the perfect refreshing snack becomes a priority. One delightful option that stands out is the Watermelon Feta Bites. This vibrant dish combines the sweet juiciness of fresh watermelon with the creamy saltiness of feta cheese, creating a symphony of flavors that is not only delicious but also visually appealing. Whether you’re hosting a summer barbecue, attending a picnic, or simply looking for a healthy treat, these bites are sure to impress your guests and leave a lasting impression.
Watermelon Feta Bites are not just another appetizer; they embody the essence of summer. The combination of sweet and savory offers a unique taste experience that elevates any occasion. This dish is incredibly easy to prepare, requiring minimal ingredients and effort, making it perfect for both novice cooks and seasoned chefs. In this article, we will delve into the essential ingredients, provide a step-by-step guide to crafting these refreshing bites, and share tips for achieving the best results.
The Allure of Watermelon Feta Bites
The allure of Watermelon Feta Bites lies in their simplicity and the delightful contrast of flavors. Watermelon, with its high water content, is synonymous with summer, evoking images of sun-soaked days and carefree moments. Paired with the briny richness of feta cheese, these bites offer a refreshing taste that complements the season perfectly.
This recipe is also versatile, making it an ideal addition to various events, from casual family get-togethers to more formal gatherings. The vibrant colors of the watermelon and feta create an inviting presentation that can easily steal the spotlight on any appetizer table. Additionally, the incorporation of fresh herbs, such as mint or basil, can further enhance the flavor profile, adding an aromatic element to each bite.
Essential Ingredients for Watermelon Feta Bites
Creating these delightful Watermelon Feta Bites requires only a handful of ingredients, which are commonly found in most kitchens. Let’s take a closer look at the essential components that come together to make this refreshing dish:
1. Fresh Watermelon
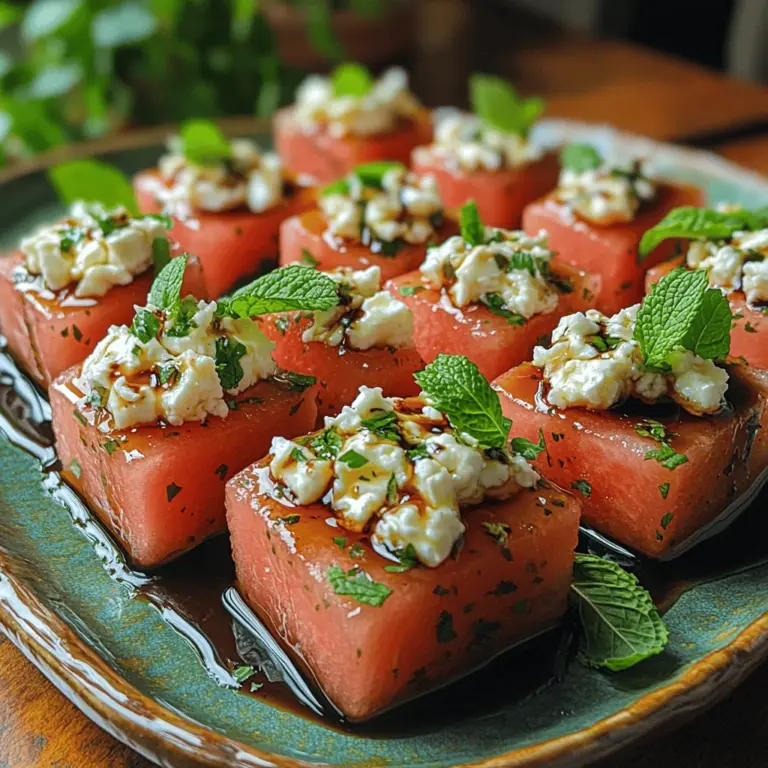
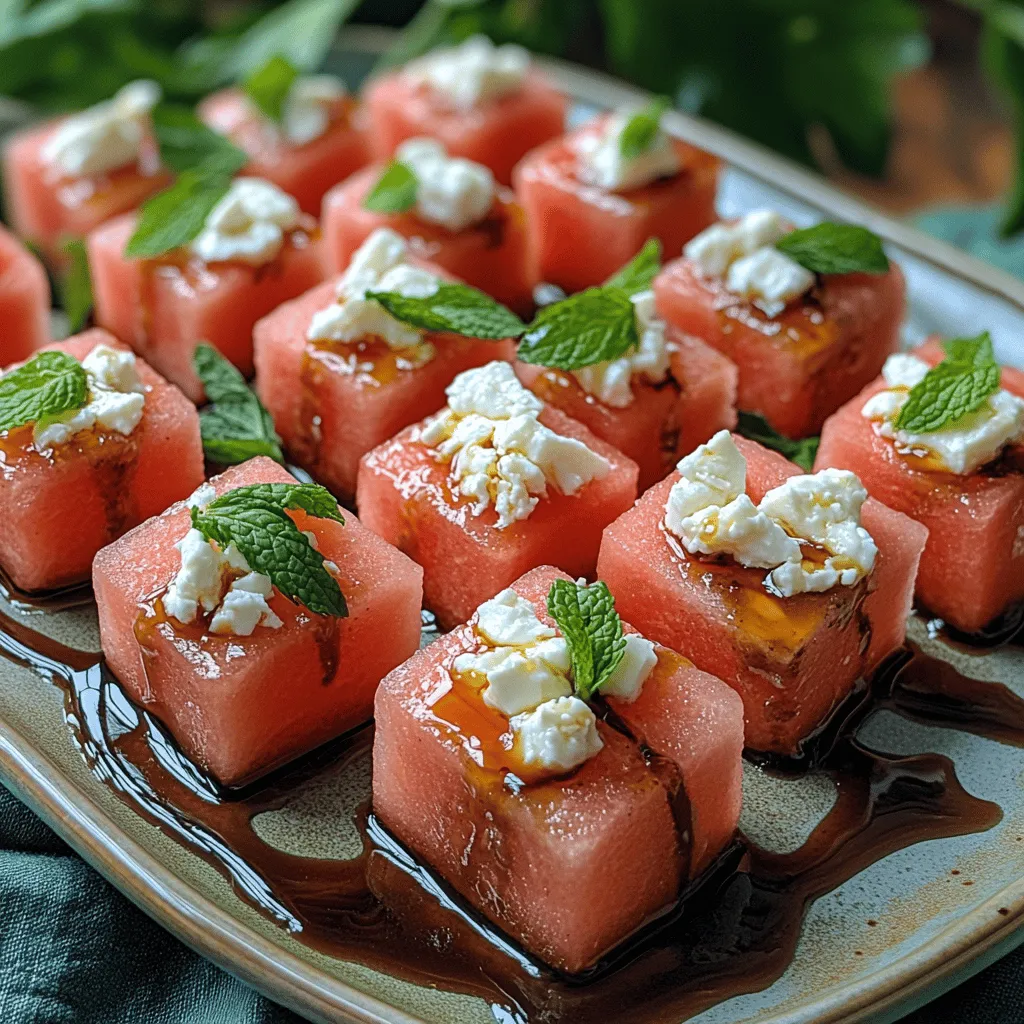
The star of the dish, watermelon, should be ripe and sweet. Look for a melon that feels heavy for its size and has a uniform shape. The best watermelons will have a deep green outer skin with a creamy yellow spot on one side, indicating it has ripened on the ground under the sun. For this recipe, watermelon is typically cut into bite-sized cubes or wedges.
2. Feta Cheese
Feta cheese adds a savory component that balances the sweetness of the watermelon. Opt for high-quality feta for the best flavor; it can be found in blocks, crumbled, or brined. The creamy texture of feta complements the crispness of watermelon beautifully. If you prefer a creamier texture, consider using a feta that is packed in brine, as it tends to be softer.
3. Fresh Herbs
While optional, fresh herbs such as mint or basil can elevate the flavor of the Watermelon Feta Bites. Mint offers a refreshing note that pairs exceptionally well with both watermelon and feta. Basil, on the other hand, adds a slightly peppery flavor that enhances the overall taste. Choose herbs based on your personal preference or the type of gathering to create a more customized flavor profile.
4. Olive Oil
A drizzle of high-quality olive oil can enhance the flavors of the dish. It adds a richness that complements both the watermelon and feta. Extra virgin olive oil is recommended for its robust flavor and health benefits.
5. Balsamic Glaze (Optional)
For an extra burst of flavor, consider adding a balsamic glaze. This syrupy reduction offers a sweet-tart contrast that can bring the entire dish together. It can be drizzled over the finished bites for an elegant touch.
Step-by-Step Instructions for Preparing Watermelon Feta Bites
Now that you have the essential ingredients, it’s time to dive into the preparation of Watermelon Feta Bites. Follow these simple steps to create this refreshing appetizer that is sure to impress:
Step 1: Prepare Your Workspace
Before you begin preparing your Watermelon Feta Bites, it’s essential to organize your workspace. Gather all the necessary tools and ingredients to streamline the cooking process. You will need:
– A cutting board
– A sharp knife for cutting the watermelon
– A mixing bowl (if incorporating herbs)
– Serving toothpicks or skewers for assembly
– A measuring spoon for drizzling olive oil and balsamic glaze (if using)
Step 2: Cut the Watermelon
Start by cutting your watermelon. Begin by slicing it in half lengthwise, then cut each half into quarters. From there, slice the quarters into smaller, bite-sized cubes or triangles, depending on your preference. Aim for uniform pieces to ensure even serving and presentation.
Step 3: Prepare the Feta Cheese
If using block feta cheese, crumble it into small pieces. If you have purchased crumbled feta, you can skip this step. The goal is to have small, manageable pieces that can easily be placed on top of the watermelon.
Step 4: Combine Ingredients
In a mixing bowl, gently toss the watermelon cubes with fresh herbs if you are using them. Be careful not to crush the watermelon as you mix. The goal is to coat the watermelon lightly with the herbs’ flavor without losing its structure.
Step 5: Assemble the Bites
Using toothpicks or skewers, take a piece of watermelon and top it with a small amount of feta cheese. For added flavor, consider layering another herb leaf, such as mint or basil, on top of the feta. This will not only enhance the flavor but also add visual appeal to your bites.
Step 6: Drizzle with Olive Oil and Balsamic Glaze
Once all the bites are assembled on a serving platter, drizzle them with olive oil and balsamic glaze if using. This step is crucial as it adds an extra layer of flavor and helps bind the ingredients together.
Step 7: Serve and Enjoy
Your Watermelon Feta Bites are now ready to be served! These bites can be enjoyed immediately or chilled in the refrigerator for a short period before serving to enhance their refreshing qualities.
By following these steps, you’ll create a dish that not only looks stunning but also delivers a burst of flavor with every bite. The combination of sweet watermelon and savory feta, along with the optional herbs and drizzles, makes for a perfect summer appetizer that embodies the spirit of the season.
Shaping the Cookies
Once you have prepared your cookie dough and are ready to bake, shaping the cookies is a crucial step in ensuring they turn out perfectly. The way you shape the dough can affect not only the appearance of your cookies but also their texture and how evenly they bake.
Tips for Portioning Dough for Uniformity
To achieve cookies that are uniform in size, use a cookie scoop or a measuring spoon. This will help you portion out the dough consistently, ensuring that each cookie bakes at the same rate. Here are some effective tips for portioning:
– Use a Cookie Scoop: A standard cookie scoop (about 1.5 tablespoons) is an excellent tool for creating uniform cookies. Simply scoop the dough and release it onto your baking sheet.
– Weigh the Dough: If you want precise control, consider weighing each ball of dough. Aim for about 30 grams (1 ounce) per cookie for a standard size.
– Divide the Dough: If you prefer to shape by hand, divide the total dough into equal portions first. This way, each cookie will be close in size.
Techniques for Shaping Dough Balls
When shaping your dough, the goal is to create a smooth, round ball that will bake evenly. Here are some techniques to achieve this:
– Roll in Your Hands: Take a portion of dough and roll it between your palms to form a smooth ball. This technique helps create a consistent surface area for baking.
– Press and Shape: For thicker cookies, you can press the dough down gently after forming balls to create a thicker round shape. This helps them spread out evenly while baking.
– Chill the Dough: If your dough is too sticky to handle, chill it in the refrigerator for about 30 minutes before shaping. This will make it easier to work with and help the cookies maintain their shape while baking.
Baking the Cookies
With your cookies shaped and ready, it’s time to move on to baking. The baking process is vital for achieving that perfect cookie texture—crispy on the outside and chewy on the inside.
Recommended Baking Temperature and Time
The general recommendation for baking chocolate chip cookies is to set your oven to 350°F (175°C). This temperature allows the cookies to bake evenly without burning. The typical baking time for standard cookies is around 10-12 minutes, but this can vary based on your oven and the size of your cookies.
Importance of Preheating and Oven Positioning
Preheating your oven is crucial for consistent baking. When you place cold dough in a cold oven, the cookies may not spread as intended, leading to an uneven texture. Additionally, consider the positioning of your baking sheets:
– Middle Rack: Always bake your cookies on the middle rack of the oven. This ensures even heat circulation and prevents the bottoms from burning.
– One Sheet at a Time: If baking multiple trays, bake one sheet at a time for the best results. If you must use two trays, rotate their positions halfway through baking to ensure even cooking.
How to Know When Cookies Are Done
Determining the doneness of your cookies can be tricky. Look for these signs:
– Color: The edges should be lightly golden while the center remains slightly soft. They will continue to bake on the sheet after you remove them.
– Touch: Gently press the center of a cookie with your finger. If it springs back, they are done; if it leaves an indentation, give them another minute or two.
– Smell: The aroma of freshly baked cookies is a good indicator. If you can smell them from the kitchen, they are likely close to being done.
Variations on the Classic Chocolate Chip Cookie
One of the joys of baking chocolate chip cookies is the endless possibilities for customization. Here are some delightful variations to consider:
Different Types of Chocolate: Exploring Flavor Profiles
While semi-sweet chocolate chips are traditional, experimenting with different types of chocolate can elevate your cookies:
– Dark Chocolate: For a richer flavor, try using dark chocolate chips or chunks. Their intense flavor pairs beautifully with the sweetness of the cookie.
– Milk Chocolate: If you prefer a sweeter cookie, use milk chocolate chips. They melt beautifully and add a creamy texture.
– White Chocolate: For a sweeter twist, incorporate white chocolate chips. They add a delightful creaminess and pair well with nuts.
Add-Ins and Mix-Ins: Nuts, Dried Fruits, and More
Get creative by adding mix-ins to your cookie dough. Here are some popular options:
– Nuts: Chopped walnuts or pecans add a nice crunch and depth of flavor. Toast them lightly before adding for extra nuttiness.
– Dried Fruits: Consider adding raisins, cranberries, or chopped apricots for a chewy texture and added sweetness.
– Coconut Flakes: Shredded coconut adds a tropical twist and chewy texture.
Gluten-Free Alternatives: Using Almond Flour or Coconut Flour
For those with gluten sensitivities, you can create delicious gluten-free cookies using alternative flours. Here are some options:
– Almond Flour: Substitute almond flour for all-purpose flour. Remember to adjust the quantity as almond flour is denser.
– Coconut Flour: Coconut flour is highly absorbent, so use it sparingly and increase the liquid in the recipe.
Vegan Chocolate Chip Cookies: Egg and Dairy Substitutes
If you’re looking for a vegan version of chocolate chip cookies, you can easily substitute eggs and dairy:
– Egg Substitutes: Use flaxseed meal or chia seeds mixed with water as an egg substitute. Combine 1 tablespoon of flaxseed meal or chia seeds with 2.5 tablespoons of water and let it sit until it thickens.
– Dairy Alternatives: Replace butter with coconut oil or vegan butter, and use dairy-free chocolate chips for a completely plant-based treat.
Common Mistakes to Avoid When Baking Cookies
Baking cookies seems simple, but several common mistakes can lead to disappointing results. Here’s how to avoid them:
Overmixing vs. Undermixing: Achieving the Right Consistency
Mixing dough is a balancing act. Overmixing can lead to tough cookies due to gluten development, while undermixing can leave dry flour pockets. Aim for a just-combined consistency.
The Impact of Cold Butter vs. Room Temperature Butter
Using cold butter can result in cookies that do not spread properly. For best results, make sure your butter is at room temperature before mixing. It should be soft but not melted.
Ignoring the Importance of Chilling Dough
Chilling your cookie dough for at least 30 minutes can enhance the flavor and texture of your cookies. Chilled dough also helps prevent excessive spreading during baking.
Misjudging Cookie Size and Spacing on the Baking Sheet
Crowding your baking sheet can lead to cookies that bake together, resulting in uneven shapes. Leave at least 2 inches of space between each cookie to allow for spreading.
Storing and Freezing Chocolate Chip Cookies
Proper storage can extend the life of your cookies and keep them tasting fresh. Here are some best practices:
Best Practices for Storing Freshly Baked Cookies
Store your cookies in an airtight container at room temperature. To maintain their softness, add a slice of bread to the container. The cookies will absorb moisture from the bread, keeping them chewy.
How to Freeze Cookie Dough for Future Enjoyment
Freezing cookie dough is a convenient way to have fresh cookies on hand. Portion the dough into balls and place them on a baking sheet to freeze for about 1-2 hours. Once frozen, transfer them to a zip-top freezer bag for up to three months.
Tips for Reheating Cookies to Restore Freshness
To revive cookies that have lost their freshness, simply pop them in a preheated oven at 350°F (175°C) for 5-10 minutes. This will restore their warmth and softness.
Pairing Suggestions for Chocolate Chip Cookies
Chocolate chip cookies are delicious on their own, but pairing them with beverages or other desserts can enhance your experience.
Classic Pairings: Milk, Coffee, and Tea
– Milk: A glass of cold milk is a classic accompaniment to chocolate chip cookies. The creaminess of milk balances the sweetness beautifully.
– Coffee: Pair your cookies with a cup of coffee for a delightful afternoon treat. The bitterness of coffee complements the sweet, rich flavors of the cookies.
– Tea: A warm cup of tea, especially chai or Earl Grey, can provide a comforting pairing.
Creative Pairings: Ice Cream Sandwiches and Dessert Platters
– Ice Cream Sandwiches: For a fun twist, sandwich a scoop of your favorite ice cream between two cookies for an indulgent treat.
– Dessert Platters: Create a dessert platter with assorted cookies, fruits, and chocolates for entertaining guests or special occasions.
Conclusion
Baking chocolate chip cookies is not only a delightful culinary experience but also a cherished tradition that brings people together. Whether you follow the classic recipe or experiment with variations, each batch has the potential to create joyful moments.
As you explore this beloved treat, remember to embrace the process—don’t hesitate to make it your own. The timelessness of chocolate chip cookies lies in their versatility and the happiness they bring when shared. So, gather your ingredients, preheat your oven, and enjoy the sweet aroma that fills your kitchen as you create a batch of these irresistible cookies. Happy baking!
