Introduction to Crispy Garlic Bread Crust Chips
Crispy garlic bread crust chips are a delightful and versatile snack that transforms the humble bread crust into a crunchy, savory treat. Whether enjoyed on their own or paired with dips, these chips are a culinary innovation that maximizes flavor and minimizes waste. With their irresistible crunch and aromatic garlic essence, they are a perfect addition to any appetizer platter or a satisfying snack for movie nights. The best part? They are incredibly easy to prepare, making them an ideal solution for utilizing stale garlic bread or leftover slices that might otherwise be discarded.
Imagine taking a bite of these chips and experiencing the satisfying crunch followed by a burst of garlicky goodness. They offer a comforting familiarity while also being a delightful surprise for your taste buds. With their rich flavor and satisfying texture, crispy garlic bread crust chips can elevate any meal, serving as a side to soups, salads, or pasta, or simply as a standalone snack that guests will adore.
The Allure of Garlic Bread
Garlic bread has an esteemed place in the world of comfort food. Its origins can be traced back to various cultures, with variations found in Mediterranean cuisines, Italian dinners, and even American bistros. This beloved side dish is often made from a base of crusty bread, slathered in a mixture of butter, garlic, and herbs, then toasted to golden perfection. The aroma of freshly baked garlic bread wafting through a home is enough to bring anyone to the table, and its rich, buttery flavor is a welcome companion to a variety of dishes.
The versatility of garlic bread has contributed to its popularity; it pairs beautifully with pasta, salads, and grilled meats, making it a staple in many households. It embodies the comforting qualities of simple ingredients coming together to create something extraordinary. From family dinners to casual gatherings, garlic bread has become a cherished addition, often served as a side that enhances the overall dining experience.
Why Transform Stale Bread into Chips?
In an era where sustainability is increasingly important, finding ways to reduce food waste is crucial. Stale bread is often overlooked and thrown away, but it can be revitalized into something truly delicious. By transforming stale garlic bread into crispy chips, you not only breathe new life into what would otherwise be discarded, but you also create a fun, crunchy snack that everyone will love. This transformation is a win-win for both your palate and your wallet, allowing you to enjoy a gourmet experience while saving money.
Using stale bread for this recipe not only cuts down on waste but also introduces a unique texture to the chips. When dried out, the bread becomes perfect for crisping up in the oven, resulting in a satisfying crunch that fresh bread simply cannot achieve. The process of making these chips is a testament to the creativity in the kitchen, showing that with a little imagination, even the most humble ingredients can shine.
Ingredients Breakdown
To create the perfect crispy garlic bread crust chips, a few key ingredients are essential. Here’s a comprehensive overview of what you’ll need:
– Garlic Bread: The star ingredient, garlic bread can be homemade or store-bought. If you have leftover slices from a previous meal, they are perfect for this recipe. Alternatively, you can whip up a quick batch of garlic bread by spreading a mixture of butter, garlic, and herbs on slices of your favorite bread.
– Olive Oil: This is crucial for enhancing the flavor of the chips and achieving the desired level of crispiness. A good quality olive oil not only adds richness but also helps to create that golden-brown finish that makes chips irresistible.
– Herbs and Spices: Seasoning your chips is vital for flavor development. Garlic powder amplifies the garlicky taste, while oregano and parsley add a fresh, herbal note. For those who enjoy a bit of heat, red pepper flakes can bring an exciting kick to the dish.
– Salt and Pepper: These basic seasonings elevate the overall taste profile of the chips. Proper seasoning is key to ensuring that every bite is packed with flavor.
– Optional Garnish: For those looking to elevate their chips even further, a sprinkle of grated Parmesan cheese can add a layer of richness and umami that enhances the overall experience.
Step-by-Step Instructions for Perfect Chips
Preheating the Oven
The first step in making crispy garlic bread crust chips is preheating your oven. This is crucial for ensuring that the chips cook evenly and achieve that perfect crunch. Set your oven to 375°F (190°C) and allow it to fully preheat before placing the bread inside. This initial heat will help to lock in flavors and moisture, providing a crisp texture that is essential for great chips.
Preparing the Bread
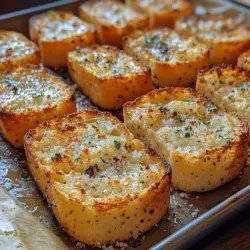
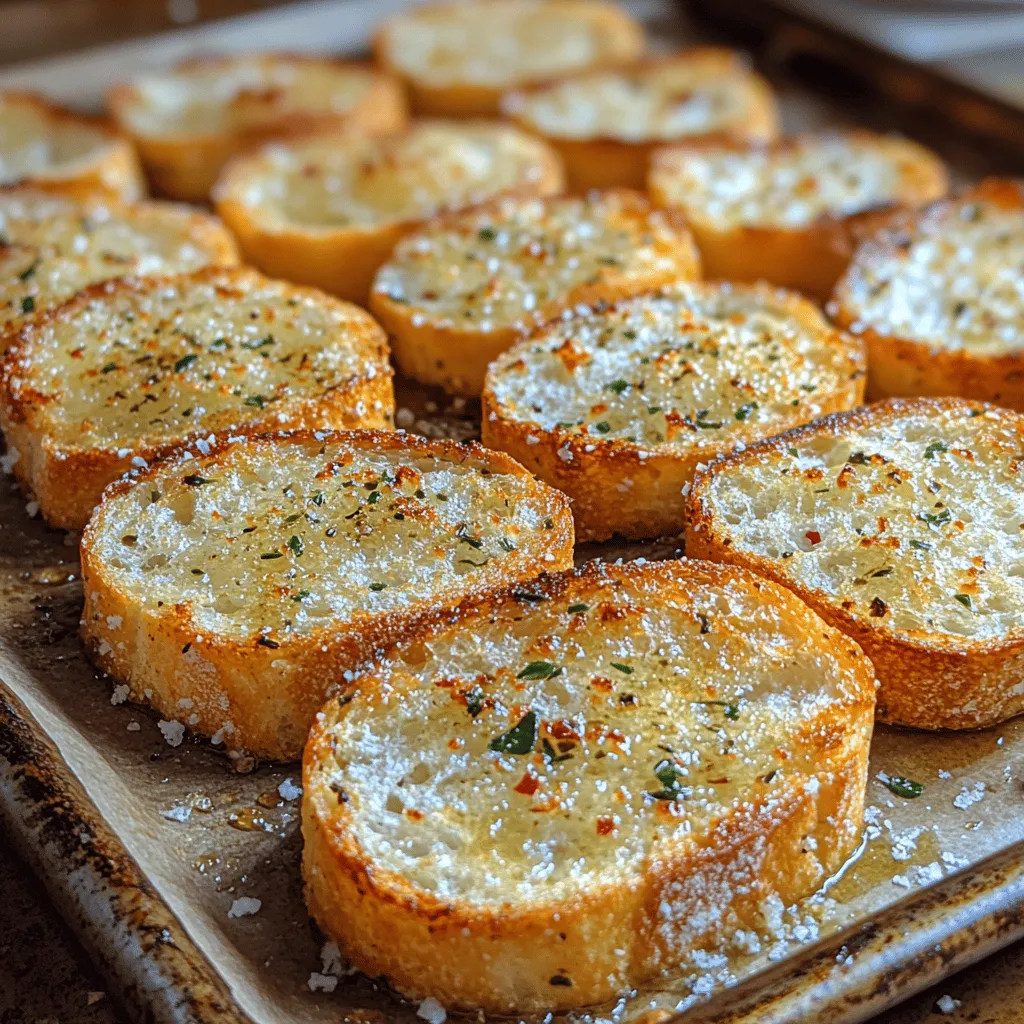
Once your oven is preheated, it’s time to prepare the bread. If you’re using leftover garlic bread, you’ll want to cut it into chips. Aim for uniform sizes to ensure even cooking; cutting them into approximately 1-inch squares or rectangles is ideal. If you’re starting with a whole loaf, slice it into pieces that are about half an inch thick. The thickness of the slices will affect the final texture, so keep in mind that thinner slices will yield crispier chips, while thicker pieces will maintain a bit more chewiness.
Next, lay the cut pieces on a baking sheet lined with parchment paper, allowing space between each piece for optimal air circulation. This will help each chip to crisp up beautifully, preventing them from steaming instead of baking. Drizzle a generous amount of olive oil over the bread pieces, ensuring each slice is coated evenly. Sprinkle the garlic powder, oregano, parsley, red pepper flakes, salt, and pepper over the top, adjusting the quantities to suit your taste preferences. Toss the bread gently to ensure that all the pieces are well-covered in the seasoning mixture.
By focusing on these initial steps, you set the stage for creating irresistibly crunchy garlic bread crust chips that are sure to impress. With the right preparation and attention to detail, you’re on your way to a snack that is not only delicious but also a fantastic way to minimize food waste and enjoy every last bite of that garlic bread.
Mixing the Seasoning
Creating the perfect seasoning blend is essential for enhancing the flavor of your crispy garlic bread crust chips. Start with a base of garlic powder, which will amplify the garlic flavor already present in the bread. Combine this with a pinch of salt to elevate all the flavors. For a bit of heat, consider adding red pepper flakes; this will give your chips a subtle kick that balances beautifully with the garlic. Dried herbs, such as oregano and basil, can also be included to add depth and a hint of Italian flair to the seasoning.
To create your seasoning blend:
1. In a small bowl, combine 1 tablespoon of garlic powder, 1 teaspoon of salt, 1 teaspoon of dried oregano, and 1 teaspoon of dried basil.
2. For those who enjoy a bit of spice, add ½ teaspoon of red pepper flakes. Adjust the amount according to your heat preference.
3. Mix all the ingredients thoroughly to ensure an even distribution of flavors.
This seasoning blend not only enhances the flavor of the chips but also provides a beautiful aroma that will fill your kitchen as they bake.
Coating the Bread
Once you have your seasoning ready, it’s time to coat the bread. This step is crucial for ensuring that each chip is packed with flavor. Here’s how to do it effectively:
1. Prepare the Bread: Start with your leftover garlic bread crusts. If they are frozen, make sure to thaw them before proceeding.
2. Brush with Oil: Lightly brush each piece of crust with olive oil. This step is vital as it not only helps the seasoning adhere but also contributes to the crispiness of the chips. Use a pastry brush for an even application.
3. Sprinkle the Seasoning: Once the bread is coated with oil, sprinkle the seasoning mixture evenly over the top. To ensure each chip is well-seasoned, you can place the seasoning in a small sifter or use your fingers to sprinkle it evenly.
4. Massage the Seasoning: For an even better coating, gently massage the seasoning into the bread with your fingers. This ensures that the flavors penetrate the crust and each chip is deliciously seasoned.
Arranging on the Baking Sheet
Proper arrangement on the baking sheet is key to achieving maximum crispiness. Here’s how to do it:
1. Preheat the Oven: Before you begin arranging the chips, preheat your oven to 375°F (190°C). This temperature is ideal for browning the chips without burning them.
2. Line the Baking Sheet: Use parchment paper or a silicone baking mat to line your baking sheet. This prevents sticking and makes cleanup easier.
3. Space the Chips: Place the coated garlic bread crusts on the baking sheet in a single layer, ensuring they do not overlap. This step is crucial; overlapping will result in steam being trapped, which prevents the chips from becoming crispy. If you have multiple layers, consider baking them in batches.
Baking the Chips
Now that your chips are arranged, it’s time to bake them to perfection:
1. Monitor the Baking Process: Place the baking sheet in the preheated oven and set a timer for 10 minutes. Halfway through the baking time, around the 5-minute mark, check on the chips and rotate the baking sheet to ensure even cooking.
2. Watch for Color: Continue baking until the chips turn a lovely golden brown color. This usually takes about 10 to 15 minutes in total, but keep an eye on them to prevent burning. The edges will crisp up first, so you can remove any chips that are browning quickly.
3. Test for Crispiness: Once they are golden and crispy, remove the baking sheet from the oven. The chips should feel firm and snap when broken. If they are still soft, return them to the oven for an additional 2-3 minutes.
Cooling and Serving Suggestions
After baking, it’s essential to let the chips cool before serving. Cooling allows the chips to firm up even more, enhancing their crunchiness. Here’s how to cool and serve them:
1. Cooling: Transfer the chips to a wire rack to cool completely. This allows air to circulate around them, preventing any moisture from accumulating on the bottom.
2. Serving Ideas: These crispy garlic bread crust chips can be enjoyed in various ways:
– Dips: Serve them with your favorite dips such as marinara, hummus, or a creamy spinach dip.
– Toppings: Use them as a crunchy topping for salads or soups, adding texture and flavor.
– Snacking: Enjoy them on their own as a satisfying snack during movie nights or gatherings.
– Cheese Platters: Include them in cheese platters for a delightful crunch that pairs well with various cheeses.
Health Benefits of Homemade Chips
Making chips at home offers several health benefits compared to store-bought options:
1. Fresh Ingredients: By using fresh bread and natural seasonings, you can control the quality of the ingredients, avoiding preservatives and artificial flavors commonly found in commercial snacks.
2. Control Over Seasoning: You can adjust the seasoning to fit your dietary preferences, whether you prefer less salt or more herbs.
3. Avoiding Additives: Homemade chips do not contain the additives often used in commercial products to prolong shelf life, making them a healthier choice.
Moreover, creating these crispy garlic bread crust chips is a fantastic way to reduce food waste, transforming what would be leftover bread into a delicious snack.
Creative Uses for Crispy Garlic Bread Crust Chips
Once you’ve mastered making these chips, you’ll find several creative uses for them in your meals:
– Topping for Salads: Crumble the chips over salads to add a delightful crunch that complements fresh greens.
– Crunchy Addition to Soups: Use the chips as a garnish for soups like tomato basil or minestrone, enhancing both flavor and texture.
– Accompaniment for Cheese Platters: Serve them alongside a variety of cheeses and cured meats for a sophisticated snack.
– Snack for Movie Nights or Gatherings: Keep a bowl of these chips on hand for casual gatherings; they’re sure to be a hit with guests.
Conclusion: Embrace the Crunch of Crispy Garlic Bread Crust Chips
Crispy garlic bread crust chips are not only a simple and delicious way to reduce food waste but also an exciting addition to your culinary repertoire. With their delightful crunch and versatile uses, these chips can elevate any meal or snack time. The satisfaction of creating something wonderful from leftover ingredients makes this kitchen endeavor rewarding.
So gather your leftover garlic bread, whip up the seasoning, and enjoy the process of making these flavorful chips. Whether you serve them with dips, use them as toppings, or enjoy them straight out of the oven, these crispy garlic bread crust chips are sure to be a crowd-pleaser. Embrace the crunch and delight in the flavors that these homemade chips bring to your table!