Introduction
If you’re on the lookout for a quick yet satisfying meal that doesn’t compromise on flavor, look no further than cheesy garlic chicken wraps. This dish is a perfect blend of tender chicken, rich cheeses, and savory garlic, all enveloped in a warm tortilla. Whether you’re preparing lunch for a busy workday, a cozy dinner at home, or need a crowd-pleasing option for gatherings, these wraps fit the bill. The balance of flavors and textures in cheesy garlic chicken wraps makes them not just a meal, but an experience that everyone will enjoy.
In this article, we’ll explore the various components that come together to make these wraps a standout dish. From understanding the role of each ingredient to following detailed preparation steps, you will gain insights that will help you create mouthwatering cheesy garlic chicken wraps right in your kitchen. We’ll also delve into the importance of quality ingredients, ensuring your meal is not only delicious but also nutritious.
Understanding the Ingredients
To create the best cheesy garlic chicken wraps, it’s crucial to understand the key ingredients that contribute to the dish’s overall flavor and texture. Each element plays a significant role in crafting the perfect wrap.
Chicken Breasts: Source of Protein
The foundation of any good chicken wrap starts with high-quality chicken breasts. These provide a lean source of protein, essential for muscle repair and overall health. When selecting chicken, look for fresh, organic options if possible. They not only enhance the flavor but also ensure you’re serving a nutritious meal that aligns with healthy eating principles.
Garlic and Onion Powders: Flavor Enhancers
Garlic and onion powders are the unsung heroes of this dish. They elevate the flavor profile of the chicken, infusing it with a robust, savory taste. Garlic, known for its health benefits, adds a pungent aroma that is irresistible. When combined with onion powder, the two create a depth of flavor that makes every bite memorable.
Olive Oil: Cooking Medium and Flavor
Using quality olive oil for cooking is vital. It not only serves as a cooking medium, allowing the chicken to sear beautifully, but also adds a fruity richness to the dish. Olive oil is also a healthier fat option, packed with antioxidants and beneficial nutrients. When sautéing, use just enough to coat the bottom of your pan for optimal cooking.
Cheeses: Creaminess and Richness
The choice of cheeses in your wraps makes all the difference. A combination of creamy mozzarella and sharp cheddar provides the perfect balance of meltiness and flavor. Mozzarella adds a gooey texture, while cheddar introduces a sharpness that cuts through the richness. Feel free to experiment with other cheeses such as pepper jack for a spicy kick or gouda for a smoky flavor.
Vegetables: Freshness and Nutrition
Adding fresh vegetables not only enhances the nutritional value of your wraps but also contributes additional layers of flavor and texture. Consider bell peppers, spinach, or even shredded carrots for a pop of color and crunch. These ingredients can be sautéed briefly to soften or added raw for a refreshing element.
Tortillas: Base for Wrapping
The final component of your cheesy garlic chicken wraps is the tortilla. A good tortilla acts as the foundation, holding all the delicious ingredients together. Opt for whole wheat or spinach tortillas to increase the fiber content or stick with classic flour tortillas for a soft texture. Regardless of your choice, ensure they are pliable for easy wrapping.
Selecting quality ingredients is paramount when it comes to ensuring that your cheesy garlic chicken wraps are both flavorful and healthy. Take the time to source fresh, high-quality items, as they will significantly enhance your dish.
Preparation Steps Explained
Now that we have a solid understanding of the ingredients, let’s walk through the detailed preparation process. Each step is designed to maximize flavor and ensure your wraps are perfectly executed.
Seasoning the Chicken: Importance of Flavor Profiling
Start by seasoning your chicken breasts generously with garlic powder, onion powder, salt, and pepper. This seasoning blend not only enhances the chicken’s natural flavors but also prepares it for a delicious sear. Allow the chicken to sit for about 15 minutes after seasoning; this helps the flavors penetrate the meat, resulting in a more flavorful dish.
Cooking Techniques: Benefits of Pan-Searing for Texture and Taste
For optimal results, pan-searing the chicken is highly recommended. Heat a skillet over medium-high heat and add your olive oil. Once the oil is shimmering, carefully place the seasoned chicken breasts in the pan. This method helps to create a golden-brown crust, locking in juices and adding a satisfying texture to each bite. Cook for about 6-7 minutes on each side, depending on the thickness of the breasts, until the internal temperature reaches 165°F (75°C).
Shredding Chicken: Best Methods for Easy Shredding and Maintaining Moisture
Once cooked, it’s time to shred the chicken, which will be the star of your wraps. There are a few methods to do this effectively:
1. Using Two Forks: The classic method is to use two forks to pull the chicken apart. This technique works best with slightly cooled chicken, as it will be easier to handle, and you’ll be less likely to burn your fingers.
2. Using a Stand Mixer: For a quicker approach, place the cooked chicken breasts in a stand mixer fitted with the paddle attachment. Mix on low speed for about 30 seconds until the chicken is shredded to your desired consistency.
Regardless of the method you choose, ensure that the chicken remains moist. If it looks a bit dry, you can drizzle a little chicken broth or olive oil over the shredded meat to enhance moisture and flavor.
Tips for Ensuring the Chicken is Perfectly Cooked and Shredded
To ensure your chicken is perfectly cooked and shredded, consider the following tips:
– Use a Meat Thermometer: This is the best way to ensure your chicken is cooked through without drying it out. Aim for an internal temperature of 165°F (75°C).
– Let the Chicken Rest: After cooking, let the chicken rest for about 5 minutes before shredding. This allows the juices to redistribute throughout the meat, keeping it tender.
– Choose Uniform Sizes: When cooking, try to select chicken breasts that are similar in size. This will help them cook evenly, reducing the risk of overcooking some pieces while others are undercooked.
By following these preparation steps, you’ll set a solid foundation for creating delicious cheesy garlic chicken wraps that will impress anyone who tries them. The key lies in the seasoning, cooking techniques, and ultimately how you choose to assemble your wraps.
Creating the Cheesy Mixture
Once your chicken is shredded and ready, the next step is to create the cheesy mixture that will be the crowning glory of your wraps. Adding cheese to the shredded chicken not only enhances the flavor but also provides that creamy, satisfying texture that everyone loves.
First, combine your shredded chicken with your chosen cheeses in a mixing bowl. If you’re using mozzarella and cheddar, the ratio can be about 1 cup of mozzarella to ½ cup of cheddar, but feel free to adjust according to your taste preferences.
To ensure the cheese melts beautifully and combines seamlessly with the chicken, you can warm the mixture slightly in a microwave or stovetop. Just make sure to stir frequently to prevent the cheese from clumping. The goal is to have a gooey, flavorful mixture that will be irresistible once wrapped in your tortillas.
You can also add a splash of cream or a dollop of sour cream to the mixture if you want to elevate the richness. This small addition can provide extra creaminess and enhance the overall flavor profile of your cheesy garlic chicken wraps.
As you prepare to assemble your wraps, consider any additional ingredients or toppings you might want to include. Fresh cilantro, a drizzle of hot sauce, or even a squeeze of lime juice can add a delightful brightness that complements the rich flavors of the cheesy mixture.
In the next part of this article, we will cover the assembly of the wraps and provide tips on cooking them to perfection, ensuring they are crispy on the outside and gooey on the inside. Stay tuned for more delicious insights into crafting the ultimate cheesy garlic chicken wraps!
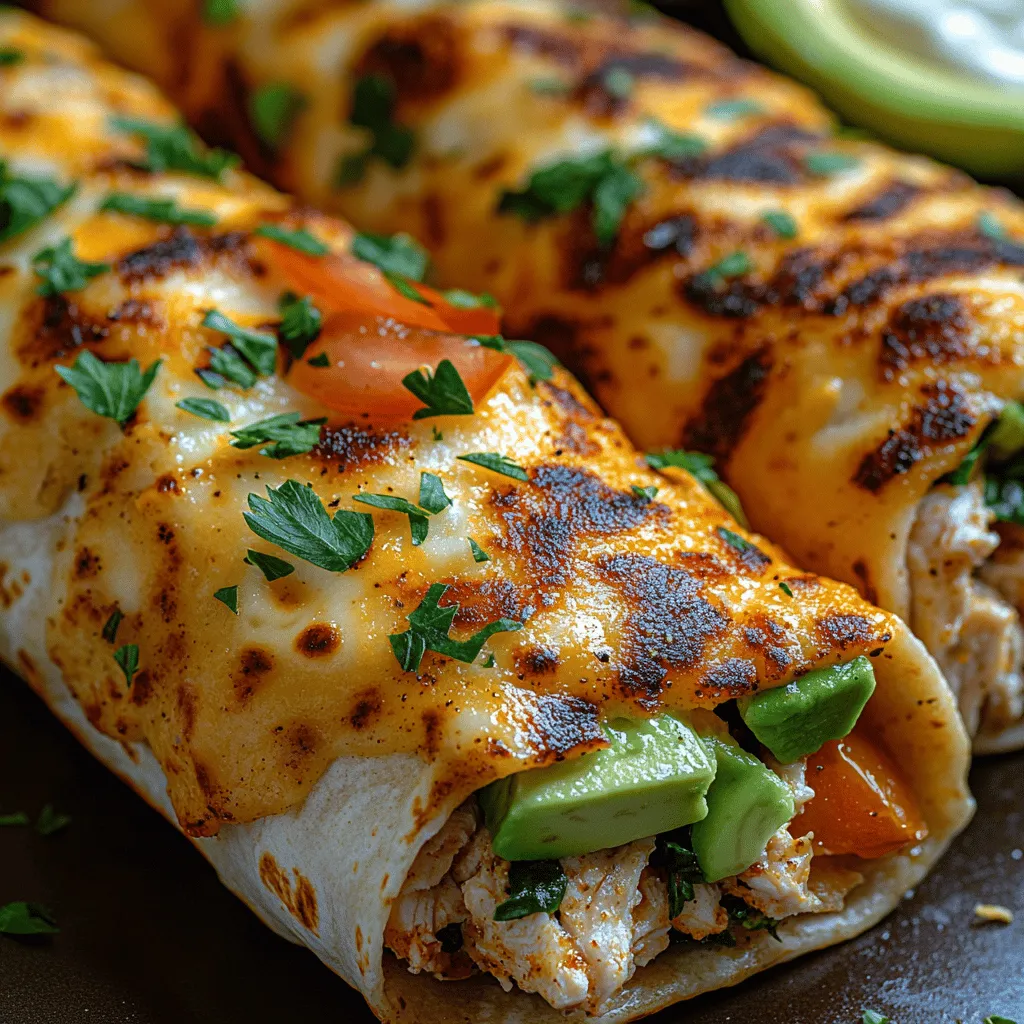
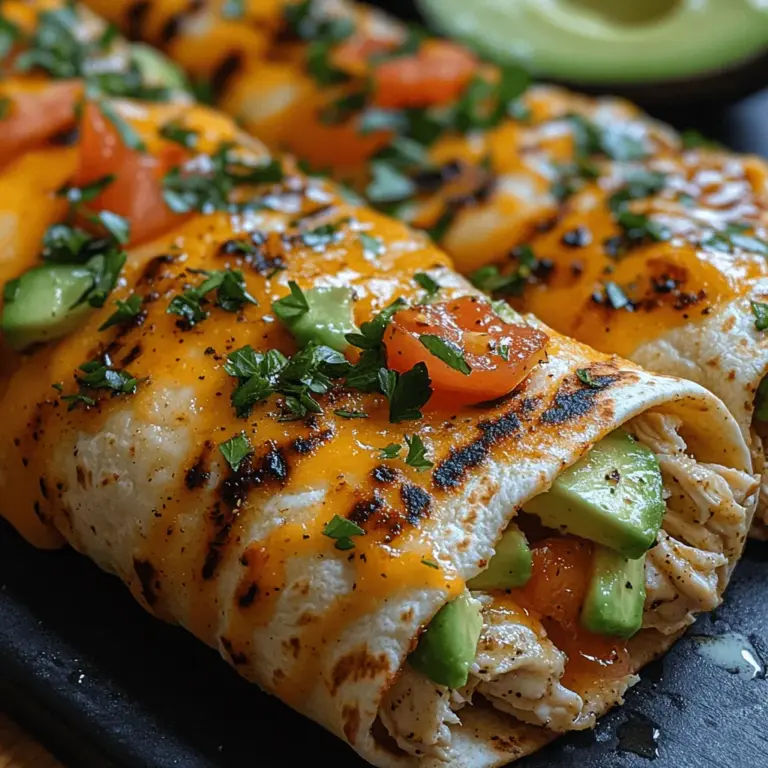
The Importance of Cheese Types in Cheesy Garlic Chicken Wraps
When crafting the perfect Cheesy Garlic Chicken Wraps, the choice of cheese is crucial. For this recipe, we recommend using a combination of mozzarella and cheddar cheese. Mozzarella is known for its excellent melting properties, providing that delightful stretch we all love in cheesy dishes. It has a mild flavor that allows other ingredients to shine while offering a gooey texture that binds the wrap together. On the other hand, cheddar adds a sharp, rich taste that enhances the overall flavor profile of the wraps. The combination of these two cheeses creates a harmonious balance of taste and texture, making each bite an extraordinary experience.
Tips for Achieving the Perfect Cheesy Consistency
To achieve the ideal cheesy consistency in your wraps, consider the following tips:
1. Grate Your Cheese: Freshly grated cheese melts better than pre-shredded cheese, which often contains anti-caking agents that can affect the meltability. Grate your mozzarella and cheddar right before using them for the best results.
2. Mix Cheese with Chicken: For an even distribution of flavor, mix the cheese with the cooked chicken before assembling the wraps. This ensures that every bite is filled with cheesy goodness.
3. Control the Heat: When heating your wraps, use medium heat to ensure that the cheese melts thoroughly without the wrap burning. A slower melt allows the flavors to meld beautifully while keeping the texture perfect.
Assembling the Wraps
Now that you have your cheeses ready, it’s time to assemble the wraps. Follow this step-by-step guide for a delicious and visually appealing result:
1. Lay the Tortilla Flat: Start with a large tortilla, either flour or whole wheat, for a more robust flavor. Lay it flat on a clean surface or a large plate.
2. Spread the Base: Begin by spreading a thin layer of garlic sauce or your chosen spread in the center of the tortilla. This will not only enhance the flavor but also help keep the other ingredients in place.
3. Layer the Chicken: Add a generous portion of the cooked garlic chicken in the center. Make sure to distribute it evenly, leaving some space around the edges for folding.
4. Add Vegetables: If you’re including vegetables, such as sautéed bell peppers or fresh spinach, layer them on top of the chicken. This adds color and nutrition while also providing a crunch that contrasts beautifully with the melted cheese.
5. Sprinkle the Cheese: Now it’s time to sprinkle the mozzarella and cheddar mixture over the top of the chicken and vegetables. Ensure an even layer to guarantee that you get cheesy goodness in every bite.
6. Fold the Wrap: Carefully fold in the sides of the tortilla first, then roll it tightly from the bottom up to create a secure wrap. Use a bit of the spread to seal the edges if necessary.
7. Visual Cues for Proper Assembly: As you fold, look for a snug fit. If the wrap feels loose, it may fall apart during cooking. A properly assembled wrap should feel firm but not overly tight.
8. Alternative Ingredients: Feel free to get creative! You can add sliced jalapeños for heat, diced tomatoes for freshness, or even substitute the chicken with shredded turkey or a plant-based protein for a vegetarian version. The possibilities are endless.
Toasting the Wraps
Toasting the wraps is an optional step, but it can elevate your dish significantly. Here’s why you should consider toasting and how to do it perfectly:
1. Benefits of Toasting: Toasting the wraps adds a delightful crunch to the outside while keeping the inside warm and gooey. This contrast in texture enhances the overall eating experience.
2. How to Toast: You can toast the wraps in a skillet, on a grill, or in an oven. For skillet toasting, heat a non-stick pan over medium heat and add a little olive oil or butter. Place the assembled wrap seam-side down in the pan and cook for 2-3 minutes until golden brown. Flip it carefully and repeat.
3. Achieving an Even Crust: To avoid burning, keep an eye on the heat and adjust as necessary. Pressing down slightly with a spatula can help achieve an even browning, but be gentle to avoid squishing the filling out.
Serving Suggestions
Once your Cheesy Garlic Chicken Wraps are ready, it’s time to think about how to serve them for maximum enjoyment. Here are some delightful ideas:
1. Pairing with Sides: These wraps pair beautifully with a variety of sides. Consider serving them with a fresh garden salad, crunchy potato chips, or even sweet potato fries for a satisfying meal.
2. Recommended Dips: Complement your wraps with dipping sauces. Ranch dressing is a classic choice, offering a creamy contrast to the cheesy wrap. You might also try a zesty salsa, guacamole, or a garlic aioli for an extra kick.
3. Enhancing the Meal: To elevate the meal experience, consider adding a side of roasted vegetables or a light coleslaw. These options not only balance the richness of the wraps but also add color and nutritional value to your plate.
Nutritional Information
Understanding the nutritional benefits of your Cheesy Garlic Chicken Wraps can help you make informed choices. Here’s a brief overview:
– Caloric Content: Each wrap contains approximately 400-500 calories, depending on the ingredients used and portion sizes. This makes them a filling meal option without being excessively high in calories.
– Protein and Fats: The chicken provides a substantial protein boost, typically around 30 grams per wrap. The combination of cheese contributes healthy fats, which are essential for satiety and energy.
– Vitamins and Nutrients: By adding vegetables, you increase the vitamin content significantly. Ingredients like spinach and bell peppers are rich in vitamins A and C, while the chicken offers B vitamins, crucial for energy metabolism.
– Dietary Preferences: This recipe can be easily adapted for various dietary needs. For a low-carb version, use lettuce wraps instead of tortillas. Gluten-free tortillas are also widely available for those with gluten sensitivities, making this dish accessible to a variety of diets.
Conclusion
In conclusion, Cheesy Garlic Chicken Wraps are a simple yet delicious meal option that can be tailored to fit any taste preference. The combination of melting mozzarella and sharp cheddar creates an irresistible cheesy experience, while the layering of ingredients ensures that every bite is packed with flavor. Whether you’re making these wraps for a family dinner, meal prep, or a casual gathering with friends, they are sure to impress.
We invite you to try making these wraps at home and experience the joy of creating a meal that is not only easy to prepare but also deeply satisfying. With the ability to adapt the recipe to suit your personal preferences, these wraps can become a staple in your cooking repertoire, perfect for any occasion. Enjoy the process, savor each bite, and let your creativity shine in the kitchen!
