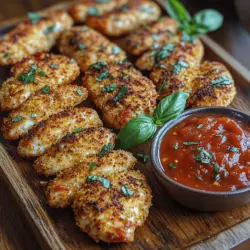
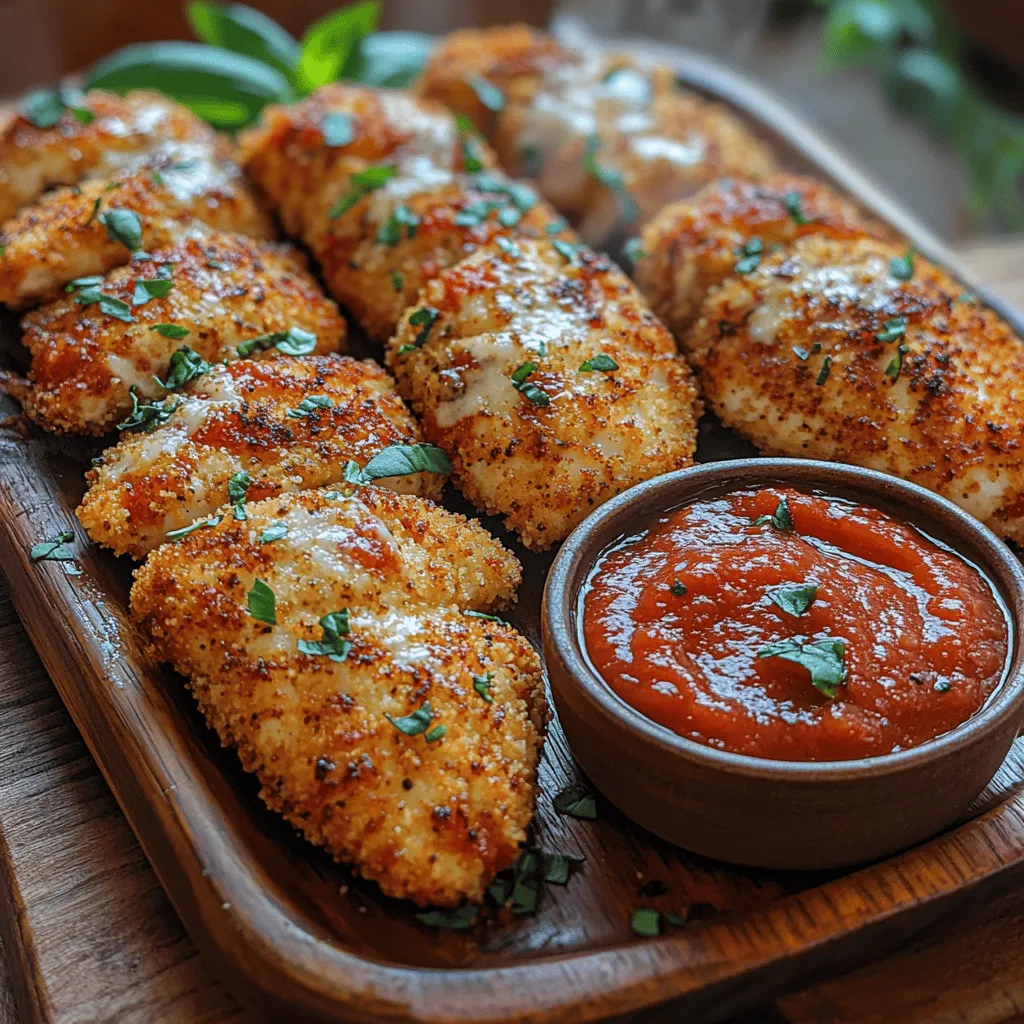
Crispy Chicken Parmesan Fingers: A Delectable Start to Your Culinary Adventure
Crispy Chicken Parmesan Fingers are a delightful fusion of flavors and textures, making them a quintessential dish for any occasion. This recipe elevates the humble chicken breast into a mouthwatering finger food, perfectly suited for family dinners, game day gatherings, or simply as a satisfying snack. Imagine tender strips of chicken enveloped in a crunchy, golden-brown coating, enhanced with the savory notes of Italian seasoning and the richness of parmesan cheese. Whether you’re looking to impress guests at a party or satisfy the cravings of your family, these chicken fingers are guaranteed to be a hit, appealing to both kids and adults alike.
The origins of Chicken Parmesan can be traced back to Italy, where the classic dish features breaded chicken cutlets baked with marinara sauce and melted cheese. This finger-friendly version maintains the essence of the traditional recipe while offering a fun and easy way to enjoy it. With the right ingredients and techniques, you can recreate this beloved dish in your own kitchen, bringing a taste of Italy to your table.
In this article, we will delve into the key ingredients that make up this recipe, explore the preparation techniques, and provide serving suggestions to ensure your Crispy Chicken Parmesan Fingers stand out in any setting.
Understanding the Ingredients
Exploring Chicken as the Star Ingredient
At the heart of this recipe is chicken breast, which serves as the primary protein source. Not only is chicken breast a versatile ingredient, but it also boasts numerous nutritional benefits. Rich in high-quality protein, it supports muscle growth and repair while being low in fat, making it an excellent choice for health-conscious eaters. Additionally, chicken breast is packed with essential vitamins and minerals, including B vitamins, phosphorus, and selenium.
When preparing Chicken Parmesan Fingers, thin strips of chicken work best for frying. The reason behind this is simple: thinner pieces cook more quickly and evenly, resulting in a tender interior that is perfectly complemented by the crispy exterior. By cutting the chicken breast into uniform strips, you ensure a consistent cooking time and texture, making it easier to achieve that coveted crunch.
The Role of Breading
The breading process is crucial for creating the signature crunch that defines Crispy Chicken Parmesan Fingers. This involves three main components: flour, eggs, and breadcrumbs. Each plays a vital role in achieving the perfect texture.
1. Flour: The first step in the breading process involves dredging the chicken strips in flour. This step not only helps the egg adhere to the chicken but also creates a barrier that aids in locking in moisture during cooking.
2. Eggs: Next, the flour-coated chicken is dipped in beaten eggs. This adds richness and helps the breadcrumbs stick to the surface. It also contributes to the overall flavor and aids in creating that golden crust.
3. Breadcrumbs: Finally, the chicken is coated in breadcrumbs, which is where the magic happens. The choice of breadcrumbs can significantly impact the final texture. Traditional breadcrumbs offer a classic approach, while Panko breadcrumbs, which are coarser and lighter, yield an even crispier result. Opting for Panko can elevate your Chicken Parmesan Fingers, providing an irresistible crunch that contrasts beautifully with the tender chicken.
Seasoning for Flavor
While the breading provides texture, seasoning is essential for enhancing the flavor of your Crispy Chicken Parmesan Fingers. A blend of Italian seasoning and garlic powder can infuse the chicken with aromatic notes that pay homage to the original Chicken Parmesan dish. Italian seasoning typically includes a mix of dried basil, oregano, rosemary, and thyme, offering a well-rounded flavor profile.
Don’t forget the basics: salt and pepper. These two simple ingredients are crucial for enhancing the natural flavors of the chicken and ensuring a balanced taste. Proper seasoning can make all the difference, transforming your chicken fingers from ordinary to extraordinary.
Setting Up Your Breading Station
Creating an Efficient Breading Area
Before diving into the preparation of your Crispy Chicken Parmesan Fingers, it’s important to set up an organized breading station. An efficient workspace will streamline the process, making it easier to coat the chicken strips evenly and avoid a messy kitchen.
Start by gathering all necessary tools: shallow bowls for the flour, eggs, and breadcrumbs, tongs for easy handling of the chicken, and a frying pan for cooking. Having everything within reach will not only save time but also minimize the risk of cross-contamination.
Step-by-Step Dredging Process
Now that your breading station is ready, it’s time to dive into the dredging process. Here’s a detailed description of each step:
1. Prepare the Chicken: Begin by cutting the chicken breast into strips, approximately 1 to 1.5 inches wide. This size ensures quick cooking and a satisfying bite.
2. Dredge in Flour: Take each chicken strip and lightly coat it in flour, shaking off any excess. This initial coating will help the egg adhere and create a barrier for moisture during frying.
3. Dip in Egg: Next, dip the floured chicken strip into the beaten eggs, ensuring it is fully coated. Allow any excess egg to drip off before proceeding to the next step.
4. Coat in Breadcrumbs: Finally, roll the egg-coated chicken in the breadcrumbs, pressing gently to ensure an even coating. Make sure to cover all sides thoroughly, as this will contribute to the crispiness of the final product.
5. Repeat the Process: Continue this dredging process with all the chicken strips until they are all coated and ready for cooking.
By following these steps, you ensure each chicken finger is evenly coated, which is key to achieving that desired crunch when frying.
Cooking Techniques for Perfectly Crispy Chicken Fingers
Choosing the Right Oil for Frying
The choice of oil is critical when frying your Crispy Chicken Parmesan Fingers, as it can affect both flavor and texture. Look for oils with high smoke points, such as canola, vegetable, or peanut oil. These oils can withstand the high temperatures necessary for frying without burning, allowing for a crispy exterior while keeping the chicken moist and tender inside.
Controlling Oil Temperature
One of the most crucial aspects of frying is maintaining the correct oil temperature. If the oil is too hot, the breading may burn before the chicken is cooked through. Conversely, if the oil is not hot enough, the chicken will absorb excess oil, resulting in greasiness rather than crispiness.
To test the oil temperature, consider using a deep-fry thermometer or dropping a small piece of bread into the oil. If it sizzles and browns in about 60 seconds, the oil is ready for frying. Alternatively, you can use a small piece of coated chicken to gauge the temperature; if it bubbles vigorously upon contact, it’s time to fry.
By carefully selecting your ingredients and following these preparation steps, you’re well on your way to creating delicious Crispy Chicken Parmesan Fingers that will delight anyone lucky enough to indulge in them. Stay tuned for the next part where we will delve into the frying techniques and serving suggestions that will take your dish to the next level!
Importance of the Right Temperature for Crispy Results
Achieving the perfect crispiness in your Chicken Parmesan Fingers hinges significantly on maintaining the right frying temperature. Generally, the ideal temperature for frying chicken is between 350°F to 375°F (175°C to 190°C). If the oil is too cold, the chicken will absorb excess oil and become greasy rather than crispy. Conversely, if the oil is too hot, the outer coating may burn before the chicken is fully cooked.
To ensure optimal frying conditions, consider using a thermometer designed for frying. This tool can accurately gauge the oil’s temperature, allowing you to fry your chicken fingers to golden perfection.
How to Tell When the Oil is Ready for Frying
Before you add your Chicken Parmesan Fingers to the oil, it’s crucial to ensure that it has reached the right temperature. Here are a few methods to check if your oil is ready:
1. Thermometer Method: As mentioned, using a thermometer is the most accurate way. Insert it into the oil without touching the bottom of the pan to get an accurate reading.
2. Wooden Spoon Test: If you don’t have a thermometer, you can use a wooden spoon. Dip the handle of the spoon into the oil; if bubbles form around it, the oil is hot enough for frying.
3. Popcorn Test: Alternatively, drop a kernel of popcorn into the oil. If it pops, the oil is ready, as this indicates it is heated to approximately 350°F.
Frying Chicken Fingers to Golden Perfection
Techniques to Avoid Overcrowding the Pan
Overcrowding your frying pan is a common mistake that can lead to soggy chicken fingers. When too many pieces are added at once, the temperature of the oil drops, causing the chicken to steam instead of fry. To avoid this, fry the Chicken Parmesan Fingers in small batches. This will help maintain the oil temperature and ensure even cooking.
Cooking Times for Optimal Crispiness
For perfectly crispy Chicken Parmesan Fingers, cook them for about 3-4 minutes on each side, depending on their thickness. They should be golden brown and reach an internal temperature of 165°F (74°C). Keep a close eye on them during frying; adjusting the cooking time slightly may be necessary based on your stove and pan.
Serving Suggestions for Chicken Parmesan Fingers
Presentation Ideas
Creating an appealing display for your Chicken Parmesan Fingers can elevate your meal. Here are some presentation tips:
– Platter Arrangement: Arrange the chicken fingers on a large platter in a fan shape or in a spiral for an eye-catching effect.
– Layering: Use a bed of fresh greens like arugula or spinach to provide a pop of color beneath the chicken fingers. This not only enhances the visual appeal but also adds freshness to the dish.
Garnishing Options that Add Flavor and Color
Garnishing can take your Chicken Parmesan Fingers to the next level. Here are some ideas:
– Fresh Herbs: Sprinkle chopped parsley or basil over the chicken for a burst of color and freshness.
– Parmesan Shavings: Add a few shavings of fresh Parmesan cheese on top just before serving for added flavor and a gourmet touch.
Dipping Sauce Varieties
Overview of Marinara Sauce and Its Pairing with Chicken
Marinara sauce is a classic pairing with Chicken Parmesan Fingers. Its tangy tomato base complements the savory chicken and crispy coating beautifully. To elevate this pairing, consider warming the sauce slightly before serving; this enhances the flavors and provides a comforting dipping experience.
Other Dipping Sauces to Consider for Variety
While marinara is a staple, offering a variety of dipping sauces can cater to different tastes. Here are a few suggestions:
– Garlic Aioli: A creamy garlic aioli adds a rich flavor that pairs perfectly with the chicken.
– Ranch Dressing: This crowd-pleaser is a favorite among many and adds a cool, creamy contrast to the crispy chicken.
– Buffalo Sauce: For those who enjoy a kick, serve some spicy buffalo sauce on the side for a bold flavor experience.
– Honey Mustard: The sweet and tangy profile of honey mustard provides a delightful contrast to the savory chicken.
Pairing Side Dishes
Suggested Sides that Complement Chicken Fingers
To create a complete meal experience, consider serving your Chicken Parmesan Fingers with complementary side dishes. Here are some excellent options:
– Caesar Salad: A crisp Caesar salad with romaine, croutons, and a creamy dressing pairs well and adds a refreshing crunch.
– Garlic Bread: Offer slices of warm garlic bread as a hearty side to soak up any remaining marinara sauce.
– Roasted Vegetables: A medley of roasted seasonal vegetables adds color, nutrients, and flavor to your plate.
Ideas for a Complete Meal Experience
To round out your meal and impress your guests, serve the Chicken Parmesan Fingers with the sides mentioned above. A glass of chilled white wine or sparkling water with lemon will complement the flavors beautifully. This combination makes for a satisfying and balanced dining experience.
Nutritional Information and Values
Breaking Down the Nutrition
Understanding the nutritional content of your Chicken Parmesan Fingers can help you enjoy them more mindfully. Below is a breakdown of the general nutritional values per serving (assuming 3-4 fingers):
– Calories: Approximately 350-400 calories
– Protein: 25-30 grams
– Carbohydrates: 20-25 grams
– Fat: 15-20 grams
Healthier Modifications
If you’re looking to lighten your Chicken Parmesan Fingers without sacrificing taste, consider these healthier modifications:
– Baking Instead of Frying: For a lower-calorie option, bake the chicken fingers instead of frying. Preheat your oven to 400°F (200°C), place the breaded chicken on a baking sheet, and spray lightly with cooking spray. Bake for about 20-25 minutes, flipping halfway through.
– Whole Wheat Breadcrumbs: Use whole wheat breadcrumbs for added fiber.
– Reduced-Fat Cheese: Opt for reduced-fat mozzarella cheese to cut back on calories and fat.
Conclusion
Crispy Chicken Parmesan Fingers are not only a delightful dish but also a versatile option for various occasions. With their crunchy exterior and juicy interior, they are sure to be a hit at any gathering. By mastering the breading and frying techniques outlined in this article, you can create a satisfying meal that is both delicious and appealing. Enjoy the process of preparing this recipe and the joy it brings to your dining table. Whether you are serving them at a party, a family dinner, or as a fun weeknight meal, these chicken fingers are bound to please both kids and adults alike. So gather your ingredients, fire up the frying pan, and enjoy a culinary adventure that ends with a plate full of crispy goodness!