Introduction
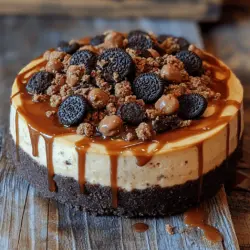
Indulging in a rich, creamy dessert can elevate any occasion, and what better way to satisfy your sweet tooth than with a Decadent No Bake Oreo Peanut Butter Cup Cheesecake? This delightful treat combines the beloved flavors of Oreo cookies and creamy peanut butter, all while being easy to prepare without the need for baking. The cheesecake is perfect for any dessert lover, offering a luscious texture and a symphony of flavors that will leave your guests raving for more.
Whether you’re hosting a gathering, celebrating a special occasion, or simply treating yourself to something special, this cheesecake is sure to impress. Its no-bake nature means you can whip it up quickly, allowing you to focus more on enjoying the moment rather than spending hours in the kitchen. In this article, we will explore the ingredients, step-by-step instructions, and the joy of creating this delightful cheesecake, guiding you through each stage of the process.
Understanding the Appeal of No-Bake Cheesecakes
No-bake cheesecakes have surged in popularity over the years, and it’s easy to see why. They offer a multitude of benefits that make them a favorite among home bakers and dessert enthusiasts alike.
Ease of Preparation
One of the most appealing aspects of no-bake cheesecakes is their simplicity. Unlike traditional cheesecakes that require baking, these desserts can be prepared without ever turning on the oven. This makes them an ideal choice for beginners or anyone hesitant about baking. The straightforward process allows for a more enjoyable experience, letting you focus on the fun of creating rather than worrying about the intricacies of baking.
Time-Saving Benefits
No-bake cheesecakes typically require less time than their baked counterparts. With minimal preparation time, you can create a stunning dessert in a fraction of the time, which is especially beneficial for those last-minute gatherings or unexpected guests. After preparing the cheesecake, it simply needs to chill in the refrigerator, allowing you to multitask and attend to other aspects of your event.
Versatility in Flavors and Ingredients
Another reason for the widespread love of no-bake cheesecakes is their versatility. The flavor combinations are virtually endless, allowing you to experiment with different ingredients to suit your taste preferences or dietary needs. From fruity versions to chocolate delights like this Oreo Peanut Butter Cup variety, the possibilities are limited only by your imagination. Additionally, the ingredient list can often be tailored to include seasonal flavors or your favorite treats, making it a fun and interactive dessert option for any occasion.
Ingredients Breakdown
Creating your Decadent No Bake Oreo Peanut Butter Cup Cheesecake begins with selecting high-quality ingredients that will contribute to the rich and satisfying flavor profile. Here’s a detailed breakdown of each component of the recipe:
For the Crust:
– Oreo Cookies: The star of the crust, Oreo cookies provide a cookie crumb base that is both flavorful and texturally satisfying. Their chocolatey richness complements the creamy filling perfectly, creating a delightful contrast of flavors and textures. Crushing the cookies into fine crumbs allows for a consistent base that holds together beautifully once mixed with butter.
– Unsalted Butter: When it comes to binding the crust, unsalted butter plays a crucial role. Using unsalted butter gives you control over the amount of salt in your dessert, allowing the sweetness of the cookies to shine through. It also adds a rich, creamy texture that enhances the overall flavor of the crust.
For the Cheesecake Filling:
– Cream Cheese: The foundation of any cheesecake, softened cream cheese is essential for achieving that signature creamy texture. It’s important to let the cream cheese come to room temperature before mixing to ensure a smooth, lump-free filling. This ingredient contributes to the rich flavor and provides the base for the other components to blend seamlessly.
– Creamy Peanut Butter: For this particular cheesecake, creamy peanut butter is a key ingredient that adds a nutty flavor and a velvety texture. The rich taste of peanut butter pairs beautifully with the sweetness of the cream cheese, resulting in a cheesecake that is both indulgent and satisfying. Be sure to choose a high-quality peanut butter for the best flavor experience.
– Powdered Sugar: Unlike granulated sugar, powdered sugar dissolves easily and adds sweetness without creating graininess in the filling. It helps to enhance the overall flavor and provides the right amount of sweetness to balance the richness of the cream cheese and peanut butter.
– Vanilla Extract: A splash of vanilla extract elevates the flavor profile of the cheesecake, adding a subtle aromatic note that complements the other ingredients. It enhances the dessert’s overall taste, making it more complex and enjoyable.
– Heavy Whipping Cream: Chilled heavy whipping cream is essential for creating a light, airy texture in the cheesecake. Whipping the cream until stiff peaks form and folding it into the cream cheese mixture creates a luscious filling that melts in your mouth. This step is crucial for achieving the perfect consistency, ensuring your cheesecake is both creamy and fluffy.
For Topping:
– Crushed Oreos and Peanut Butter Cups: For the finishing touch, crushed Oreos and chopped peanut butter cups make for a decadent topping that not only enhances the flavor but also adds visual appeal. The combination of textures from the crunchy cookies and the smooth chocolate of the peanut butter cups creates a delightful contrast that makes every bite an indulgent experience.
– Chocolate Syrup: A drizzle of chocolate syrup adds a finishing touch that elevates the dessert’s presentation and flavor. It not only enhances the aesthetic but also provides an extra layer of sweetness that ties all the elements together beautifully.
Step-by-Step Instructions
Now that we have explored the ingredients and their significance, it’s time to delve into the step-by-step instructions for preparing your Decadent No Bake Oreo Peanut Butter Cup Cheesecake. Follow these detailed steps to ensure your cheesecake turns out perfectly every time.
Preparing the Crust:
1. Crush the Oreos: Begin by placing your Oreo cookies in a food processor and pulse until they reach a fine crumb consistency. If you don’t have a food processor, you can place the cookies in a zip-top bag and use a rolling pin to crush them. Aim for small, even crumbs to ensure a cohesive crust.
2. Mix with Butter: In a medium mixing bowl, combine the crushed Oreos with melted unsalted butter. Stir the mixture until all the crumbs are evenly coated, resembling damp sand. This step is crucial as it will allow the crust to hold together once pressed into the pan.
3. Press into the Pan: Transfer the crust mixture into a 9-inch springform pan. Use the back of a measuring cup or your fingers to firmly press the crumbs into the bottom and slightly up the sides of the pan. This creates a solid base for your cheesecake that will hold its shape when sliced.
4. Chill the Crust: Place the crust in the refrigerator for about 10–15 minutes to set while you prepare the cheesecake filling. Chilling the crust will help it firm up and make it easier to work with during assembly.
By following these steps, you set the foundation for a cheesecake that is not only delicious but also visually appealing. With the crust prepared, you’ll be ready to move on to the next stages of crafting your Decadent No Bake Oreo Peanut Butter Cup Cheesecake.
Stay tuned for the next section, where we will dive into creating the creamy filling that will make this dessert truly unforgettable.

Mixing Crushed Oreos with Melted Butter
To create the perfect crust for your Decadent No Bake Oreo Peanut Butter Cup Cheesecake, start by mixing crushed Oreos with melted butter. The combination of these two ingredients forms the base of your cheesecake, providing a rich and flavorful foundation.
1. Crushing the Oreos: Begin by taking about 24 Oreo cookies and placing them in a food processor. Pulse the cookies until they reach a fine crumb consistency. If you don’t have a food processor, you can place the cookies in a zip-top bag and crush them with a rolling pin. Aim for a texture that resembles sand, with no large chunks remaining.
2. Melting the Butter: In a microwave-safe bowl, melt 1/2 cup of unsalted butter. Heat it in increments of 15-20 seconds, stirring in between, until completely melted. Allow the melted butter to cool slightly before mixing it with the crushed Oreos.
3. Combining the Ingredients: Pour the melted butter into the bowl of crushed Oreos. Use a spatula to mix thoroughly until all the crumbs are coated with butter, creating a damp mixture that holds together when pressed.
Tips for Achieving a Firm Crust
Achieving a firm crust is crucial for the structural integrity of your cheesecake. Here are some tips to ensure your crust is perfectly set:
– Press Firmly: When transferring the Oreo mixture into a springform pan, use the back of a measuring cup or your fingers to press the crumbs firmly into the bottom and slightly up the sides. The more compact your crust is, the better it will hold together when sliced.
– Pre-Chill the Pan: For added firmness, consider chilling the springform pan in the refrigerator for about 15-20 minutes before adding the cheesecake filling. This helps the crust set and makes it easier to remove later.
– Baking Option: If you prefer a more traditional crust, you can bake the crust at 350°F (175°C) for about 10-12 minutes. Let it cool completely before adding the filling. Baking enhances the flavor and helps to firm up the crust, but remember, this is a no-bake cheesecake, so chilling will suffice.
Making the Cheesecake Filling
The cheesecake filling is the heart of your dessert, combining cream cheese, peanut butter, and whipped cream for a light yet indulgent texture. Here’s how to prepare it:
1. Proper Mixing Techniques for Cream Cheese and Peanut Butter: In a large mixing bowl, add 16 ounces of softened cream cheese and 1 cup of creamy peanut butter. Using an electric mixer, beat them together on medium speed until the mixture is smooth and well combined. Scrape down the sides of the bowl as needed to ensure all ingredients are incorporated. This step is crucial for avoiding lumps in your cheesecake filling.
2. Whipping Cream: Achieving Stiff Peaks: In a separate bowl, whip 1 cup of heavy cream using a hand mixer or stand mixer. Start on low speed and gradually increase to high speed until soft peaks form. Continue whipping until stiff peaks are achieved, which means that the cream holds its shape firmly when the beaters are lifted. This adds lightness to your cheesecake filling.
3. Folding Techniques to Maintain Airiness: Gently fold the whipped cream into the peanut butter and cream cheese mixture using a spatula. Start by adding a small amount of whipped cream to lighten the mixture, then gradually fold in the remaining whipped cream. Use a gentle motion to maintain the airiness of the whipped cream, ensuring your cheesecake remains light and fluffy.
Assembling the Cheesecake
Now that both your crust and filling are prepared, it’s time to assemble your cheesecake.
1. Pouring and Spreading the Filling: Spoon the cheesecake filling onto your prepared Oreo crust. Use an offset spatula or the back of a spoon to spread the filling evenly across the crust. Be gentle to avoid disturbing the crust beneath.
2. Properly Adding Toppings for Optimal Presentation: For a finishing touch, consider drizzling additional peanut butter or chocolate sauce over the top of the cheesecake. You can also sprinkle crushed Oreos or mini peanut butter cups for added texture and visual appeal. This not only enhances the flavor but also makes your cheesecake look even more enticing.
Chilling Process
Once assembled, the cheesecake needs to chill to set properly.
1. Importance of Chilling Time for Setting: Cover the cheesecake with plastic wrap or a lid and place it in the refrigerator. Allow it to chill for at least 4-6 hours, although overnight is preferable. This chilling time helps the filling firm up and melds the flavors together, ensuring a delicious end result.
2. Factors Affecting Setting Time: Several factors can influence the setting time of your cheesecake, including the temperature of your ingredients (room temperature ingredients mix better) and the humidity in your kitchen. If your cheesecake isn’t fully set after the recommended chilling period, give it more time in the fridge.
Serving Suggestions and Presentation Ideas
To elevate your cheesecake experience, consider the following serving suggestions:
– Creative Serving Suggestions: Slice the cheesecake into wedges and serve it plain or with a dollop of whipped cream. You can also serve individual portions in dessert cups, layering the cheesecake with crushed Oreos and whipped cream for an attractive parfait.
– Pairing Ideas with Beverages or Other Desserts: This cheesecake pairs wonderfully with a rich cup of coffee or a glass of cold milk. For dessert pairings, consider serving it alongside a scoop of vanilla ice cream or a drizzle of chocolate sauce for an extra indulgent treat.
– Using Garnishes for Added Visual Appeal: Fresh berries, such as raspberries or strawberries, can add a pop of color to your cheesecake. A sprinkle of chopped peanuts or a dusting of cocoa powder can also enhance its visual presentation.
Nutritional Information
Understanding the nutritional profile of your Decadent No Bake Oreo Peanut Butter Cup Cheesecake can help you enjoy it mindfully.
– Providing a Comprehensive View of the Cheesecake’s Nutritional Profile: Each serving of this cheesecake (assuming 12 servings) contains approximately:
– Calories: 350
– Total Fat: 25g
– Saturated Fat: 13g
– Carbohydrates: 30g
– Sugars: 20g
– Protein: 6g
– Considerations for Dietary Restrictions and Adjustments: For those with dietary restrictions, consider using gluten-free Oreos for a gluten-free version. You can also swap out regular cream cheese for a dairy-free alternative to make it vegan-friendly. Adjusting the sugar content or using sugar substitutes can also cater to those monitoring their sugar intake.
Conclusion
In summary, the Decadent No Bake Oreo Peanut Butter Cup Cheesecake is not only a treat for the taste buds but also an easy-to-make dessert that brings joy to any occasion. With its rich flavors and creamy texture, this cheesecake stands as a testament to the delightful possibilities of no-bake desserts. Whether enjoyed at a party or as a personal indulgence, this recipe is sure to become a favorite in your dessert repertoire. Embrace the experience of creating and sharing this cheesecake, and enjoy the sweet moments it brings.