Introduction
In the world of desserts, few treats can rival the luxurious experience of a well-made mousse. This Decadent Salted Caramel Mousse combines rich flavors and a light, airy texture, making it an indulgent choice for any occasion. The harmonious blend of sweet and salty elements creates a dessert that tantalizes the taste buds while also pleasing the eye. With its layers of silky salted caramel and fluffy whipped cream, this mousse is not just a dish; it’s an experience to savor.
The origins of mousse date back to France, where the term itself means “foam.” Traditionally, mousse has been crafted from a variety of ingredients, including chocolate, fruits, and even savory components. However, the evolution of mousse into the dessert we know and love today is a testament to culinary innovation and creativity. The Decadent Salted Caramel Mousse takes this classic technique and infuses it with the rich, buttery flavor of caramel, enhanced by a touch of sea salt, providing a perfect balance that elevates the dessert to new heights.
Creating this exquisite mousse involves mastering a few essential techniques and understanding the science behind each ingredient. The interplay between sweet and salty, as well as the texture that comes from incorporating air, is key to achieving the ultimate dessert experience. In this article, we will explore the intricate process of creating this mousse, from the origins of its components to the meticulous steps required to ensure the perfect result.
Understanding Mousse: A Culinary Perspective
Exploring the Origins of Mousse
Mousse has a long and storied history in French cuisine, dating back to the 18th century. Initially, it was considered a savory dish, often made with ingredients like fish or meat. However, it was not long before sweet mousses, particularly those made with chocolate, began to gain popularity. The light, airy texture of mousse comes from the incorporation of whipped air, which can be achieved through various techniques, including folding in whipped cream or beaten egg whites. This method of aeration is what gives mousse its signature lightness, allowing it to melt in the mouth.
With the rise of dessert innovations in the 20th century, the sweet mousse became a staple in upscale restaurants and bakeries, capturing the hearts of dessert lovers worldwide. The introduction of salted caramel into the dessert lexicon has further enhanced the allure of mousse, making it a go-to option for those seeking a sophisticated yet comforting treat.
Defining Mousse: Texture and Technique
At its core, mousse is defined by its texture—smooth, creamy, and light. The word itself evokes feelings of airiness, and achieving the right consistency is paramount. A well-made mousse should have a delicate structure that holds its shape while still being soft enough to melt away on the palate. This is accomplished through the careful folding of whipped cream or beaten egg whites into a base mixture, which can consist of chocolate, fruit puree, or, in this case, salted caramel.
The technique used to create mousse is as important as the ingredients themselves. Achieving the perfect texture often requires patience and precision, as overmixing can deflate the air incorporated into the mousse, resulting in a dense and unappealing final product. Understanding the science of aeration and how it interacts with the ingredients is vital for anyone looking to master this dessert.
The Role of Air in Mousse Creation
Air is the secret ingredient that transforms a dense mixture into a light and fluffy mousse. When whipped, both cream and egg whites expand in volume as air bubbles are trapped within their structure. This aeration process is crucial for creating the desired texture. When properly folded into the mousse base, these whipped components contribute to the overall lightness of the dessert.
However, achieving the perfect balance of air is a delicate task. Too much whipping can lead to over-aeration, causing the mixture to become grainy or even separate. Conversely, under-whipping may not create enough volume, resulting in a heavy, unappetizing mousse. Throughout this recipe, we will emphasize the importance of technique to ensure that your Decadent Salted Caramel Mousse is both light and indulgent.
The Allure of Salted Caramel
What Makes Salted Caramel Special?
The rise of salted caramel has transformed the dessert landscape, captivating the palates of food enthusiasts everywhere. The combination of sweet caramel with a sprinkle of sea salt creates a complex flavor profile that is both rich and satisfying. Salt acts as a flavor enhancer, bringing out the depth of the caramel while balancing its sweetness. This intriguing juxtaposition has made salted caramel a beloved ingredient in various confections, from chocolates to ice creams, and of course, mousses.
The appeal of salted caramel lies not only in its flavor but also in the sensory experience it provides. The smoothness of the caramel, combined with the subtle crunch of salt, creates a multi-layered tasting experience that keeps you coming back for more. In the context of our mousse, the salted caramel acts as a star ingredient, infusing the dessert with its signature flavor while contributing to the overall texture.
The Perfect Balance: Sweet vs. Salty
Creating the right balance between sweetness and saltiness is crucial when crafting a Salted Caramel Mousse. Too much salt can overwhelm the palate, while too little can leave the dessert tasting one-dimensional. The key is to find that sweet spot where the flavors complement rather than compete with each other. This balance is often achieved through experimentation, allowing you to adjust the salt content according to your personal taste preferences.
In this recipe, the salted caramel serves as the foundation for the mousse, providing both flavor and a rich, velvety texture. As we proceed with the preparation, we’ll focus on how to achieve this equilibrium, ensuring that each spoonful of mousse is a harmonious blend of sweet and salty.
The Science Behind Caramelization
Understanding the science of caramelization is essential for anyone looking to create a perfect salted caramel. Caramelization occurs when sugar is heated, causing it to melt and gradually develop a deep, complex flavor. This process involves a series of chemical reactions that transform the sugar into a rich golden-brown liquid. The temperature at which this transformation occurs is crucial; too low, and the sugar will not develop the desired flavor, while too high can result in burnt sugar that tastes bitter.
For our Decadent Salted Caramel Mousse, achieving the perfect amber color is key. This not only signals that the caramel has reached the right flavor profile but also contributes to the overall aesthetic of the dessert. As we delve deeper into the recipe, we will discuss how to monitor the caramelization process closely to ensure that you achieve that coveted depth of flavor without losing the sweetness that makes caramel so delightful.
Ingredients Breakdown
To create the Decadent Salted Caramel Mousse, we must first understand the role each ingredient plays in the final product. The following breakdown will provide insights into the significance of each component, allowing you to appreciate the careful balance that goes into crafting this dessert.
Granulated Sugar: Choosing the Right Type
The foundation of any caramel recipe begins with sugar. Granulated sugar is the standard choice for caramelization due to its fine texture and ability to melt evenly. When heated, granulated sugar undergoes a transformation that is critical for developing the rich flavors we associate with caramel. For this recipe, it’s essential to use high-quality granulated sugar to ensure the best results.
Heavy Cream: Importance of Fat Content
Heavy cream is another vital ingredient in our mousse. Its high fat content contributes to the rich, creamy texture of the dessert. When whipped, heavy cream adds volume and lightness, creating the signature airy feel of mousse. Additionally, the cream’s fat content helps to stabilize the mixture, ensuring that it holds its shape once set. In this recipe, opting for heavy cream with at least 36% fat will yield the best results.
Unsalted Butter: Enhancing Flavor and Texture
Unsalted butter plays a crucial role in the salted caramel component of our mousse. It not only contributes to the rich flavor but also adds a smooth, velvety texture. Using unsalted butter allows for greater control over the saltiness of the final dish, ensuring that the balance between sweet and salty remains intact. It’s important to choose high-quality butter, as its flavor will greatly impact the overall taste of the mousse.
Sea Salt: Elevating the Dessert Experience
The right type of salt can elevate a dessert from ordinary to extraordinary. Sea salt, with its larger crystals, adds a delightful crunch and bursts of flavor that enhance the caramel. When incorporated into the mousse, it provides those irresistible salty notes that contrast beautifully with the sweetness of the caramel. As we prepare the mousse, we’ll discuss how to incorporate sea salt at just the right moments to maximize its impact.
Egg Whites: The Key to Lightness
Egg whites are the secret weapon in achieving the light, airy texture that defines mousse. When whipped, egg whites create a stable foam that adds volume and structure to the dessert. This ingredient is essential for ensuring that the mousse has the right consistency and holds its shape. It’s important to use fresh egg whites for optimal results, as older eggs may not whip as well.
Vanilla Extract: Adding Depth of Flavor
To round out the flavor profile of our mousse, vanilla extract is added. This ingredient provides a warm, aromatic quality that complements the richness of the caramel. Using pure vanilla extract is preferable, as it offers a more complex flavor than imitation varieties. Just a small amount goes a long way in enhancing the overall taste of the mousse.
Optional Garnishes: Personalizing Your Mousse
While the Decadent Salted Caramel Mousse is delightful on its own, optional garnishes can add an extra touch of elegance and personalization. Consider topping the mousse with whipped cream, chocolate shavings, or a sprinkle of toasted nuts for added texture and visual appeal. These garnishes not only enhance the presentation but can also introduce new flavor dimensions, making your dessert even more memorable.
Step-by-Step Guide to Making Decadent Salted Caramel Mousse
Now that we have a solid understanding of the ingredients and their roles, we can begin the process of making our Decadent Salted Caramel Mousse. The first step in this culinary adventure is creating the salted caramel itself, a process that requires attention to detail and a bit of patience.
Creating the Salted Caramel
The first phase of our mousse-making journey involves crafting the salted caramel. This step is crucial, as the quality and flavor of the caramel will directly influence the overall outcome of the dessert.
The Process of Cooking Sugar
Start by measuring out the granulated sugar and placing it in a heavy-bottomed saucepan over medium heat. It’s essential to use a heavy pan, as it distributes heat evenly and helps prevent the sugar from burning. Stir the sugar gently with a wooden spoon or silicone spatula as it begins to melt. Avoid using metal utensils, as they can scratch the pan’s surface.
As the sugar melts, it will clump together before eventually liquefying. Continue to stir gently to ensure that the sugar melts evenly, keeping a close eye on the color. You want to achieve a deep amber color, which typically takes around 8 to 10 minutes, depending on your stove and the amount of sugar used.
Achieving the Perfect Amber Color
Once the sugar has melted, it will start to bubble and darken. At this stage, it’s crucial to monitor it closely, as sugar can go from perfectly caramelized to burnt in a matter of seconds. When the sugar reaches a rich amber color, remove the saucepan from the heat.
Incorporating Cream and Butter Safely
With the caramel at the right color, it’s time to incorporate the heavy cream and unsalted butter. Be cautious during this step, as adding these ingredients to hot caramel can cause it to bubble vigorously. Gradually pour in the heavy cream while stirring continuously. The mixture may bubble and steam, so take care to avoid burns.
Once the cream is fully incorporated, add the unsalted butter and a pinch of sea salt, stirring until smooth and well combined. Allow the salted caramel to cool slightly before using it in the mousse.
As we continue with the next steps, we will integrate the cooled salted caramel into the mousse base, ensuring that each layer of this decadent dessert is infused with the rich flavors that make it extraordinary. Stay tuned for the next part, where we will explore how to assemble the mousse and achieve that perfect texture that will leave your guests in awe.
Preparing the Mousse Base
Creating a luxurious salted caramel mousse requires careful attention to detail, particularly in preparing the mousse base. This process involves whipping cream and mastering egg whites to achieve the perfect texture, followed by combining these elements with the rich salted caramel.
Whipping Cream: Techniques for Success
The key to achieving a voluminous and stable whipped cream lies in the temperature and technique. Start with cold heavy cream, ideally chilled for a few hours in the refrigerator before use. This helps the cream whip more easily and hold its shape better.
1. Equipment: Use a clean, dry mixing bowl and whisk or electric mixer. If using a hand whisk, be prepared for a workout!
2. Whipping Process: Begin whipping the cream at medium speed until it starts to thicken. Gradually increase to high speed. Watch closely for soft peaks to form, which should take about 3-5 minutes. Soft peaks are when the cream holds a shape but still has a slight droop.
3. Stabilization: If desired, you can add a tablespoon of powdered sugar or cornstarch to stabilize the whipped cream, ensuring it maintains its structure even after mixing with the mousse.
Mastering Egg Whites: From Foam to Stiff Peaks
Egg whites play a crucial role in giving the mousse its light and airy texture. Here’s how to whip them to perfection:
1. Freshness: Use fresh eggs, as older eggs may not whip as well. Separate the yolks from the whites carefully, ensuring no yolk contaminates the whites.
2. Equipment: Ensure your mixing bowl is clean and completely free of fat. A copper bowl is ideal for whipping egg whites due to its ability to stabilize the foam.
3. Whipping: Start beating the egg whites on medium speed until they become frothy. Gradually increase the speed to high and continue whipping until soft peaks form. At this stage, add a pinch of salt or a few drops of lemon juice to help stabilize the mixture.
4. Stiff Peaks: Continue whipping until stiff peaks form, where the egg whites stand tall and do not droop when the whisk is lifted.
Folding Techniques: Preserving Airiness
Folding is a gentle technique used to combine the whipped cream and egg whites with the caramel without deflating the air incorporated into them. Here’s how to do it properly:
1. Initial Mixing: Begin by adding a small portion of the whipped cream into the egg whites first. This helps to lighten the egg whites, making it easier to incorporate the denser caramel mixture.
2. Gentle Motion: Use a spatula to fold the mixture. Slide the spatula under the mixture, lift it, and turn it over. Rotate the bowl as you fold to ensure even mixing. Repeat this motion until just a few streaks remain.
3. Final Incorporation: Add the caramel to the mixture and fold gently until fully combined. Be cautious not to overmix, as this will deflate the mousse.
Combining Caramel and Mousse
In this section, we will focus on how to effectively combine the caramel with the mousse base while ensuring a harmonious flavor and texture.
Understanding the Folding Process
The folding process is crucial in maintaining the light and airy structure of the mousse. Here are key points to remember:
– Temperature: Ensure the caramel has cooled slightly before folding it into the mousse base. Hot caramel can melt the whipped cream and egg whites, compromising the mousse’s texture.
– Gradual Addition: Always add the caramel gradually. This helps the mixture integrate smoothly without losing volume.
Ensuring Even Distribution of Caramel
To achieve that beautiful salted caramel flavor throughout the mousse, it is essential to ensure even distribution. Here’s how to do it:
1. Swirl Technique: Instead of folding the caramel directly into the mousse, consider using a swirl technique. Add dollops of caramel on top of the mousse mixture and gently fold through. This method creates swirls of caramel that enhance both flavor and presentation.
2. Taste Test: Before fully combining, taste a small amount of the mixture. Adjust the caramel if necessary, adding more for a richer flavor or less if it’s too sweet.
Chilling and Serving Your Mousse
Once your mousse is prepared, it’s vital to chill it properly before serving. This step ensures that the mousse sets correctly and achieves the desired texture.
Importance of Refrigeration for Setting
Chilling your mousse is essential for the perfect consistency. Here’s why:
– Time Frame: Allow the mousse to chill in the refrigerator for at least 4 hours, but overnight is ideal. This extended chilling allows the flavors to meld and the texture to firm up appropriately.
– Covering: Cover the mousse with plastic wrap to prevent it from absorbing any odors from the fridge.
Presentation Tips for an Elegant Finish
The way you serve your mousse can elevate the dining experience. Here are some presentation ideas:
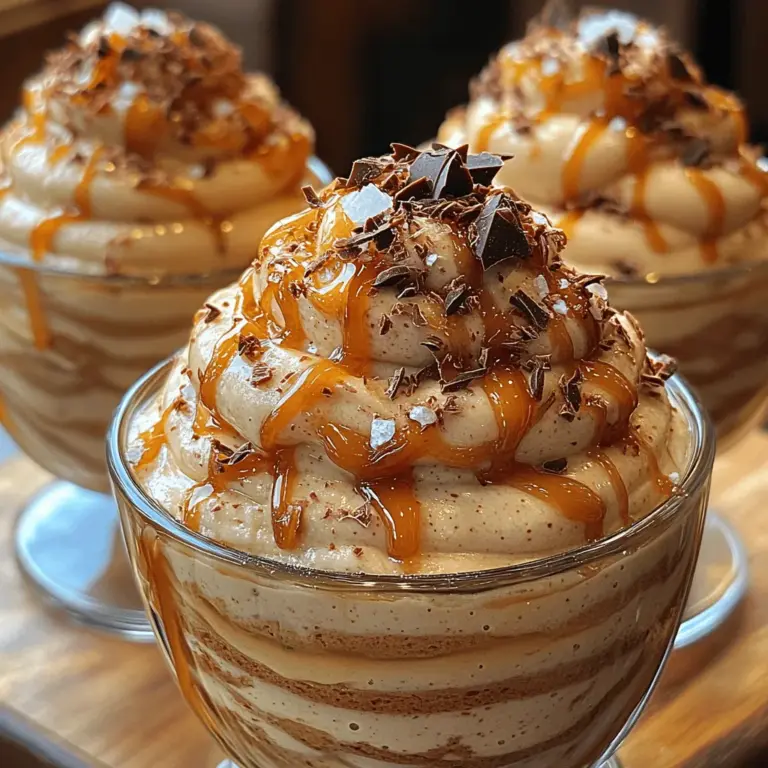
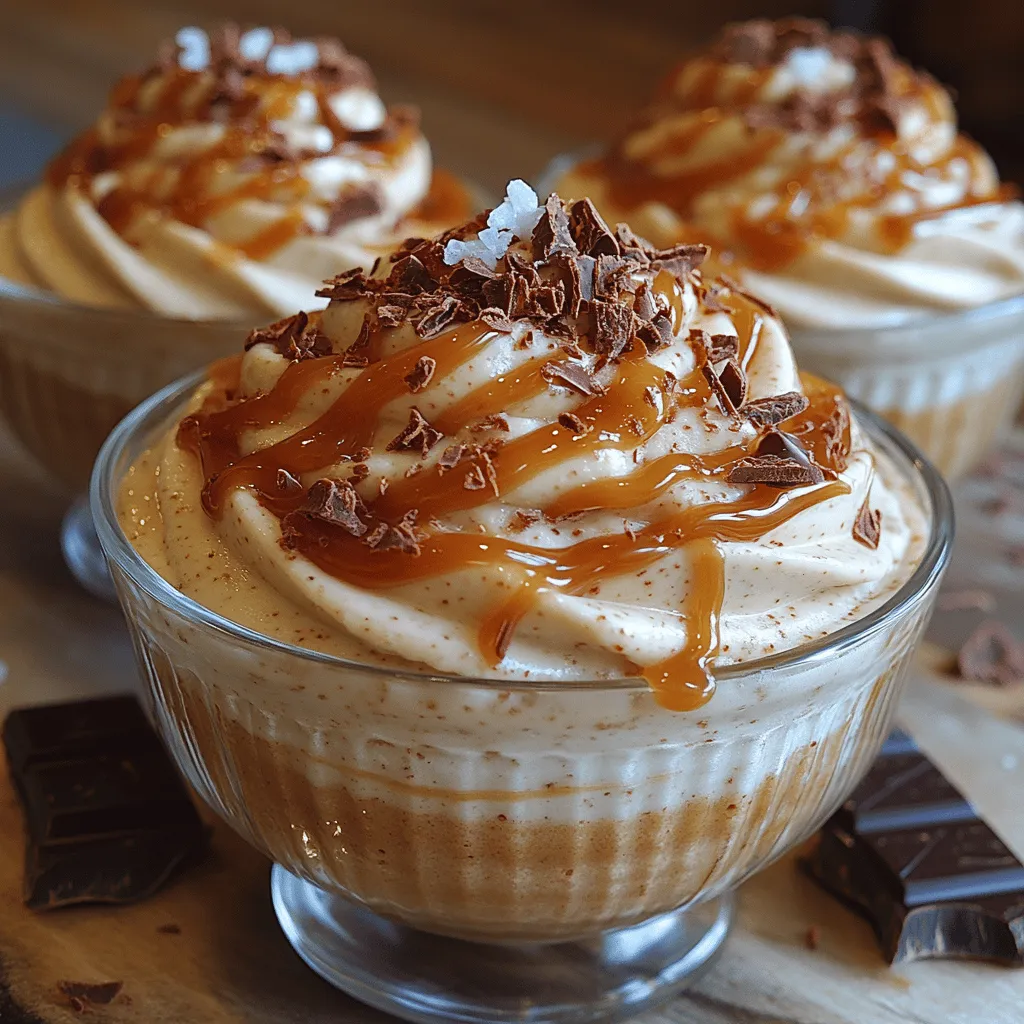
1. Serving Dishes: Consider using elegant glass cups or dessert bowls to showcase the mousse’s layers and textures. Clear containers are perfect to highlight the caramel swirls.
2. Garnishes: Top each serving with a sprinkle of sea salt to enhance the caramel flavor, or add a dollop of whipped cream for added richness. Fresh berries or chocolate shavings also make a beautiful contrast.
3. Chocolate Drizzle: Drizzle some melted chocolate over the top for an extra touch of decadence.
Nutritional Information and Dietary Considerations
Understanding the nutritional aspects of your dessert can help you make informed choices, especially for those with dietary restrictions.
Caloric Content of the Mousse
A typical serving of salted caramel mousse contains approximately 350-400 calories. This varies based on the specific ingredients used and portion sizes.
Possible Modifications for Dietary Restrictions
If you or your guests have dietary restrictions, consider these modifications:
– Gluten-Free: This mousse is naturally gluten-free, making it a safe choice for those with gluten intolerance.
– Dairy-Free Option: Substitute the heavy cream with coconut cream and use a plant-based caramel sauce to create a delicious dairy-free version.
Alternative Ingredients for Health-Conscious Cooks
For those looking to make a lighter version of this decadent dessert, consider the following substitutes:
– Sugar Alternatives: Use coconut sugar or erythritol for a lower glycemic index option.
– Reduced Fat: Use light cream or a mixture of Greek yogurt and light cream to reduce calories while maintaining creaminess.
Common Mistakes to Avoid
Even the most experienced cooks can make mistakes. Here are some common pitfalls to watch out for:
Overcooking the Caramel
Caramel can go from perfectly golden to burnt in a matter of seconds. Keep a close eye on the caramel as it cooks, and remember to remove it from heat as soon as it reaches a deep amber color.
Deflating the Mousse Mixture
Folding is a delicate technique. Be gentle and avoid vigorous stirring, which can deflate the mousse and result in a denser texture.
Inadequate Chilling Time
Rushing the chilling process can lead to a mousse that is too soft and does not hold its shape. Always allow enough time for the mousse to set properly.
Serving Suggestions and Pairings
To enhance your dining experience, consider these serving suggestions and pairings that complement the flavors of your salted caramel mousse.
The Perfect Accompaniments for Your Mousse
– Cookies or Biscotti: Serve with buttery shortbread cookies or crunchy biscotti for a delightful contrast in texture.
– Fruit: Fresh fruit, particularly raspberries or strawberries, provide a tart counterbalance to the sweetness of the mousse.
Beverage Pairings: Wine, Coffee, and More
Choosing the right beverage can elevate your dessert experience:
– Wine: A sweet dessert wine, such as a late-harvest Riesling or Moscato, pairs beautifully with the richness of the mousse.
– Coffee: A rich espresso or a flavored coffee can complement the dessert’s flavors while providing a nice contrast.
Creative Presentation Ideas
– Layered Parfaits: For an impressive presentation, layer the mousse with crushed cookies and caramel sauce in a glass jar.
– Themed Desserts: Create a dessert platter featuring different mousses or desserts inspired by salted caramel, allowing guests to sample a variety.
Conclusion
The decadent salted caramel mousse is a celebration of flavor and texture, reflecting the artistry of dessert-making. With its rich, creamy body complemented by the bold notes of salted caramel, it stands as a testament to the joys of indulging in a well-crafted dessert. Whether for a special occasion or simply to satisfy a sweet tooth, this mousse is sure to impress. As you embark on your culinary journey to create this delightful treat, remember that practice makes perfect, and each attempt brings you closer to mastering this luscious dessert. Enjoy the process, and savor the delicious results!
