Introduction to Peachy Chill Galette
The Peachy Chill Galette is a delightful dessert that beautifully marries the sweetness of fresh peaches with a rich, flaky crust, making it an ideal choice for summer gatherings or cozy evenings at home. This rustic pie-like dessert not only showcases the natural flavors of its main ingredient but also provides a refreshing treat that can be enjoyed chilled or at room temperature. In this article, we will explore the intricacies of making this galette, from ingredient selection to baking tips, ensuring your journey in the kitchen is as satisfying as the final product.
Understanding Galettes: A Rustic Classic
Exploring the Concept of Galettes
Galettes, often referred to as free-form pies, have a history that dates back centuries. Originating in France, the term “galette” encompasses a variety of flat, round pastries made from pastry dough that can be sweet or savory. Unlike traditional pies encased in a rigid pie pan, galettes are characterized by their rustic charm and simplicity. The dough is rolled out into a rough circle, filled with fruit or other ingredients, and then folded over the edges to create a casual yet appealing presentation.
The fundamental difference between galettes and traditional pies lies in their structure and preparation. While pies typically require precise measurements and a uniform shape, galettes embrace imperfection, allowing the cook to be more flexible and creative. This ease of preparation makes galettes a popular choice for home bakers, providing a delicious dessert without the stress of perfection.
Benefits of Choosing a Galette
Choosing to make a galette offers several advantages. Firstly, the preparation is straightforward and requires minimal fuss, making it accessible for bakers of all skill levels. The rustic nature of galettes means they can be assembled quickly, allowing you to spend less time in the kitchen and more time enjoying the company of family and friends.
Another benefit of galettes is their versatility. While this recipe focuses on fresh peaches, galettes can be filled with a wide variety of fruits, such as berries, apples, or plums, depending on what is in season. This adaptability makes them a perfect dessert for any occasion, from casual summer picnics to more formal gatherings.
Ingredients Breakdown: What You Need for a Perfect Peachy Chill Galette
Fresh Peaches: The Star Ingredient
When making a Peachy Chill Galette, the peaches are undoubtedly the star of the show. Selecting ripe peaches is crucial for achieving optimal sweetness and flavor. Look for peaches that are slightly soft to the touch and have a fragrant aroma, as these are indicators of ripeness. Avoid peaches that are overly firm or have blemishes, as they may lack flavor.
Once you’ve sourced the perfect peaches, it’s essential to prepare them properly for the galette. Start by washing the peaches thoroughly to remove any dirt or residue. Next, slice the peaches into thin wedges, discarding the pit. The goal is to achieve uniform slices that will cook evenly, ensuring a delightful texture in the final product.
The Role of Flavor Enhancers
To elevate the sweetness of the peaches and create a well-balanced flavor profile, incorporating flavor enhancers is key. One of the most important ingredients is lemon juice, which acts as a natural counterbalance to the sweetness of the fruit. A splash of lemon juice not only brightens the flavors but also prevents the peaches from browning too quickly.
When it comes to sweetening your galette, you have options. Both honey and maple syrup can serve as excellent sweeteners, each adding its own unique flavor. Honey imparts a floral note, while maple syrup brings a rich, earthy depth. Choose the sweetener that best complements your taste preferences and the natural sweetness of the peaches.
Additionally, a touch of vanilla extract can elevate the entire flavor profile, adding warmth and complexity to the dessert. Just a teaspoon will enhance the overall taste without overpowering the peaches.
Thickening Agents: Cornstarch vs. Tapioca Starch
To achieve the ideal consistency in your galette filling, using a thickening agent is essential. As the peaches bake, they will release juices that can make the filling overly runny. Cornstarch and tapioca starch are two popular options, each with its own advantages.
Cornstarch is a common thickener that creates a smooth texture when cooked. It works well to absorb excess moisture and can create a glossy finish. However, it may not be as effective in freezing scenarios. On the other hand, tapioca starch provides a more stable thickening agent, making it an excellent choice if you plan to freeze the galette for later enjoyment. It results in a clearer, more gel-like filling, which is particularly appealing in fruit desserts.
The Crust: Pre-made vs. Homemade
When it comes to the crust of your Peachy Chill Galette, you have the option of using a pre-made pie crust or making your own from scratch. Using a pre-made crust can save you time and simplify the process, especially if you are short on time or new to baking. Many grocery stores offer high-quality frozen pie crusts that can be easily rolled out and filled.
If you prefer to take a more hands-on approach, making your own pie crust can be a rewarding experience. A homemade crust allows you to control the ingredients and customize the flavor to suit your preferences. Typically, a basic pie crust consists of flour, butter, salt, and water. The key to a flaky crust lies in keeping the butter cold and not overworking the dough.
Step-by-Step Guide to Making Peachy Chill Galette
Preparing the Peaches: The Flavor Base
Now that you understand the importance of selecting ripe peaches and the role of flavor enhancers, it’s time to focus on preparing the peaches for your Peachy Chill Galette. Begin by washing the peaches thoroughly under running water to remove any dirt or pesticides. Once clean, slice the peaches into wedges, approximately 1/4 inch thick. This thickness allows for even cooking and helps maintain a pleasant texture in the final dessert.
After slicing the peaches, place them in a large mixing bowl. Add a tablespoon of lemon juice to brighten the flavors and prevent browning. Depending on your taste preferences and the natural sweetness of the fruit, sprinkle in your chosen sweetener—honey or maple syrup—along with a tablespoon of your chosen thickening agent, whether it be cornstarch or tapioca starch. Finally, add a splash of vanilla extract for extra depth of flavor.
Gently toss the peach slices in the bowl until they are well coated with the lemon juice, sweetener, and thickening agent. Allow the mixture to sit for about 10-15 minutes. This resting time will allow the flavors to meld together and the thickening agent to start working, helping to create a luscious filling for your galette.
With the peaches prepped and ready, you are now one step closer to creating a delicious Peachy Chill Galette that will impress your family and friends. Stay tuned for the next section, where we will dive into the process of assembling and baking this delightful dessert.
Detailed Instructions for Combining Ingredients for the Filling
To prepare the filling for your Peachy Chill Galette, start by gathering your ripe peaches. Aim for about 4-5 medium-sized peaches, ensuring they are slightly soft to the touch, which indicates they are perfectly ripe. First, wash the peaches thoroughly, then peel and slice them into thin wedges. This will allow the peaches to cook evenly and blend beautifully with the other ingredients.
In a mixing bowl, combine the sliced peaches with 1/4 cup of granulated sugar, 1 tablespoon of cornstarch, 1 teaspoon of vanilla extract, and a squeeze of fresh lemon juice. The sugar will enhance the sweetness of the peaches, while the cornstarch acts as a thickening agent, ensuring your filling isn’t too runny. The lemon juice adds a bright acidity that balances the sweetness, making the flavor more complex.
Once combined, it is crucial to let the mixture rest for about 15-20 minutes. This resting period allows the sugar to draw out the natural juices from the peaches, creating a syrupy base that will infuse the galette with flavor. This step is essential as it enhances the overall taste and ensures a deliciously moist filling.
Rolling Out the Dough: Achieving the Perfect Crust
Techniques for Rolling Out Pie Crust
After resting the filling, it’s time to roll out the pie crust. Start by lightly flouring your work surface and placing the chilled dough in the center. Using a rolling pin, gently roll the dough from the center outward, applying even pressure. Rotate the dough occasionally to maintain a circular shape, aiming for about 1/8-inch thickness.
If the dough sticks to the surface, lift it gently and sprinkle a bit more flour underneath. Remember, the key to a flaky crust is to handle the dough minimally and keep it cool, so if you notice it becoming too warm, pop it back into the refrigerator for a few minutes.
Tips for Maintaining the Dough’s Integrity During Transfer
Transferring the rolled-out dough to your baking sheet can be tricky, but with a few techniques, you can maintain its integrity. A helpful method is to roll the dough around the rolling pin lightly before unrolling it onto the baking sheet. This technique allows for a smooth transfer without tearing the dough.
Once the dough is in place, ensure it fits the baking sheet comfortably, leaving a bit of overhang around the edges. You can trim any excess if necessary, but a rustic look is encouraged for galettes, which adds to their charm.
Assembling the Galette: Rustic Charm
Methodical Instructions for Filling and Folding the Dough
Now that your dough is ready, it’s time to assemble the galette. Start by spooning the peach filling into the center of the rolled-out dough, leaving about 2 inches of space around the edges. Spread the filling evenly, but don’t worry about being too precise; the rustic nature of a galette embraces imperfection.
Next, fold the edges of the dough over the filling, creating pleats as you go. This folding technique not only adds visual interest but also helps contain the juices from the filling during baking. If the dough tears slightly, don’t fret; simply pinch it back together to maintain the structure.
Visual Cues to Identify the Ideal Rustic Appearance
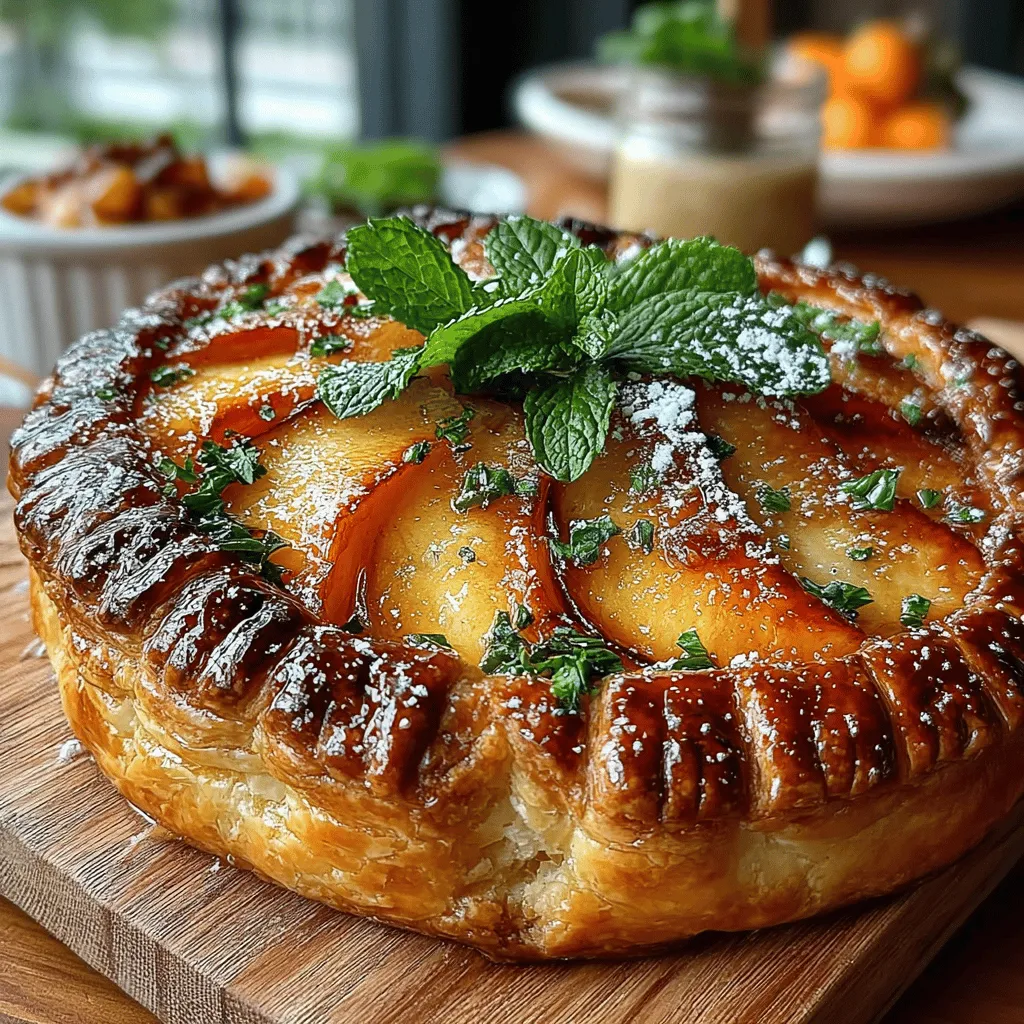
You’ll know you’re on the right track when the galette resembles a beautiful, free-form tart. The edges should be crimped and folded over, allowing the filling to peek through. At this point, you can also sprinkle a little coarse sugar on top of the crust for an added crunch and sparkle when baked.
Creating the Perfect Egg Wash
Explanation of Egg Wash Components and Their Purpose
An egg wash is essential for achieving a beautifully golden and shiny crust. To prepare the egg wash, whisk together one egg with a tablespoon of milk or water. The liquid helps create a glossy finish, while the egg gives the crust its rich color.
Techniques for Achieving a Golden Crust
Using a pastry brush, gently apply the egg wash over the folded edges of the galette. Be careful not to let the wash drip into the filling, as this can lead to a soggy bottom. A thin layer is sufficient; too much egg wash can result in a sticky texture.
Chilling and Baking: The Final Steps
Importance of Chilling Before Baking for Texture
Before baking, it’s beneficial to chill the assembled galette in the refrigerator for about 20-30 minutes. Chilling the dough again ensures it stays flaky and maintains its shape while baking.
Setting Oven Temperatures and Baking Times for Best Results
Preheat your oven to 400°F (200°C). Once the oven is ready, place the galette on the middle rack. Bake it for 30 to 35 minutes or until the crust is golden brown and the filling is bubbly. Keep an eye on the galette during the last few minutes; if the edges brown too quickly, you can cover them with a strip of aluminum foil to prevent burning.
Serving Suggestions and Presentation Ideas
How to Serve the Peachy Chill Galette
For the best experience, serve the Peachy Chill Galette either chilled or at room temperature. Each option brings out different flavors, so feel free to experiment based on your preference. When serving, consider garnishing with a few fresh mint leaves for an added pop of color and a hint of freshness.
Pairing Suggestions
To enhance your dessert experience, pair the galette with a scoop of vanilla ice cream or a dollop of whipped cream. For beverages, consider serving it alongside a refreshing glass of iced tea, lemonade, or even a sweet dessert wine. If you’re looking for side dishes, a light salad with a citrus vinaigrette can provide a refreshing contrast to the sweetness of the galette.
Storage Tips for Leftovers
Best Practices for Storing Peachy Chill Galette
If you happen to have any leftovers (which is often unlikely given how delicious this galette is), storing them properly is key to maintaining freshness. Allow the galette to cool completely before wrapping it in plastic wrap or aluminum foil. Alternatively, you can place it in an airtight container.
Duration for Which the Galette Stays Delicious
When stored properly, the Peachy Chill Galette will remain delicious for up to 3 days at room temperature. If you want to extend its shelf life, you can refrigerate it, where it will stay fresh for up to a week. Just be sure to reheat it in the oven for a few minutes before serving to bring back its delightful texture.
Conclusion: Embracing the Joy of Homemade Desserts
The Peachy Chill Galette is more than just a dessert; it’s a celebration of seasonal fruits and homemade goodness. With its simple yet impressive presentation, this galette can bring joy to any dining table. By following the outlined steps and understanding the importance of each ingredient, anyone can create this delicious treat, making it a perfect addition to summer festivities or a delightful end to any meal. Embrace the process of baking and savor the results, as this Peachy Chill Galette is sure to impress family and friends alike.
With each bite, you’ll taste the warmth of homemade baking and the delightful essence of summer peaches, reminding you that the best desserts often come from the heart and the kitchen. So gather your ingredients, roll up your sleeves, and get ready to bake a galette that will be the star of your next gathering!