
Introduction
In the world of dips, few can claim the charm and versatility of a good ranch dip. Whether you’re hosting a lively gathering, enjoying a cozy family night, or simply indulging in a quiet evening snack, a zesty ranch dip always manages to steal the spotlight. However, many store-bought versions are laden with preservatives and artificial flavors, making the homemade option not only a tastier alternative but also a healthier choice. Enter the zesty Greek yogurt ranch dip, a fresh take on the classic that is sure to elevate your snacking experience.
The origins of ranch dip can be traced back to the 1950s, when a hidden valley ranch dressing mix was introduced in California. Since then, ranch has become a beloved flavor in American cuisine, gracing everything from salads to wings. The creamy texture and herbaceous flavors are universally appealing, making it a staple in many households. By incorporating Greek yogurt into the recipe, we not only enhance the flavor profile but also boost the nutritional value, making it a guilt-free indulgence.
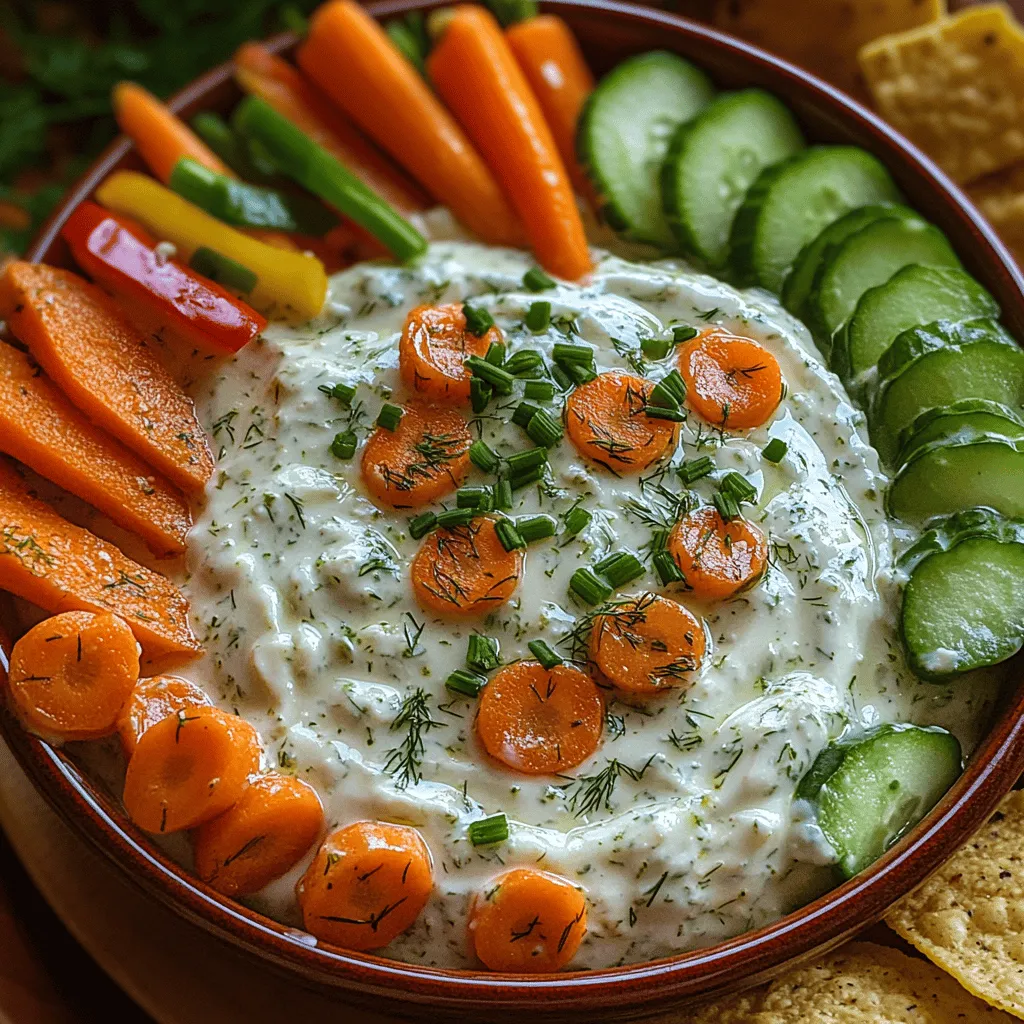
What makes this zesty Greek yogurt ranch dip particularly special is its balance of tanginess and creaminess, paired with a medley of fresh herbs and spices. It’s the perfect accompaniment to fresh vegetables, chips, or even as a flavorful spread for sandwiches. With just a few simple ingredients, you can whip up this delightful dip that is sure to impress your guests and satisfy your cravings.
Understanding Greek Yogurt Ranch Dip
The classic ranch dip is often characterized by its creamy texture and zesty flavor. Traditionally made with a base of buttermilk, sour cream, and mayonnaise, this dip can be quite rich and calorie-dense. However, by substituting Greek yogurt in place of some of these ingredients, we can create a lighter version that retains all the beloved flavors while packing in protein and probiotics.
Variations of ranch dip exist around the world, with different cultures adding their own unique twists. From spicy versions with jalapeños to herb-infused recipes using fresh dill, the possibilities are endless. Greek yogurt adds a distinctive tang that enhances the overall flavor and gives this dip a refreshing quality that is perfect for summer gatherings or year-round snacking.
The science behind the texture of ranch dip lies in the balance of ingredients. While traditional recipes might lean heavily on mayonnaise or sour cream for creaminess, Greek yogurt provides a thicker, more robust texture without the excess fat. This results in a dip that is not only delicious but also satisfying, making it easier to enjoy without the guilt.
Ingredients for the Perfect Zesty Greek Yogurt Ranch Dip
Creating the perfect zesty Greek yogurt ranch dip begins with selecting high-quality ingredients. Each component contributes to the overall flavor and texture, so it’s worth taking the time to choose wisely. Here are the essential ingredients you will need:
– Greek Yogurt: The star of the show, Greek yogurt serves as the creamy base for our dip. Opt for plain, unsweetened Greek yogurt to avoid any unwanted flavors. The thickness of Greek yogurt also helps create a dip that holds its shape well.
– Fresh Herbs: A combination of fresh herbs adds depth and flavor to the dip. Common choices include dill, parsley, and chives. Fresh herbs not only enhance the taste but also bring a vibrant color to the dip.
– Garlic Powder: This ingredient contributes a savory note that complements the other flavors. Garlic powder is often preferred over fresh garlic in dips, as it blends more seamlessly into the mixture.
– Onion Powder: Similar to garlic powder, onion powder provides a subtle sweetness and depth of flavor without overwhelming the dip.
– Lemon Juice: A splash of fresh lemon juice adds brightness and balances the creaminess of the yogurt. It also enhances the zesty profile of the dip.
– Salt and Pepper: Essential seasoning that brings out the flavors of the other ingredients. Adjust to taste based on your preference.
– Optional Add-ins: For those looking to elevate their dip even further, consider incorporating additional flavors like smoked paprika for a hint of smokiness, or a dash of hot sauce for an extra kick.
Step-by-Step Instructions for Making Zesty Greek Yogurt Ranch Dip
Now that we’ve gathered all our ingredients, it’s time to dive into the preparation. This zesty Greek yogurt ranch dip is incredibly easy to make and requires minimal effort. Here’s a step-by-step guide to creating this delicious dip:
1. Preparing Your Workspace
Before you start mixing, it’s essential to prepare your workspace. Gather all your ingredients and tools, including a mixing bowl, a whisk or spoon for blending, and measuring cups and spoons. Make sure your cutting board and knife are ready if you’re using fresh herbs.
2. Mixing the Dip
In a medium-sized mixing bowl, add the Greek yogurt as your base. Using a whisk or spoon, begin to break up the yogurt to create a smooth consistency.
Next, add in the dried herbs and spices: garlic powder, onion powder, salt, and pepper. Follow this with the fresh lemon juice, which will help to thin the yogurt slightly and enhance the flavor.
If you’re adding any optional ingredients like smoked paprika or hot sauce, this is the time to include them. Mix all the ingredients thoroughly until everything is well combined and the dip is smooth.
3. Chilling the Dip
Once your dip is mixed, it’s important to let the flavors meld together. Cover the bowl with plastic wrap or transfer the dip to an airtight container. Refrigerate for at least 30 minutes. This chilling time allows the flavors to develop and intensify, resulting in a more delicious dip.
4. Serving Suggestions
After the dip has chilled, it’s ready to be served! Transfer it to a serving bowl and garnish with a sprinkle of fresh herbs or a drizzle of olive oil for an extra touch of flavor. Pair it with an assortment of fresh vegetables, chips, or even use it as a sauce for grilled meats or sandwiches.
5. Storage Tips
If by chance you have leftovers, store them in an airtight container in the refrigerator. The dip will stay fresh for up to a week, making it a great option for meal prep or as a quick snack throughout the week.
With these simple steps, you can enjoy a zesty Greek yogurt ranch dip that is not only delicious but also nutritious. Perfect for any occasion, this dip is sure to become a favorite in your household.
Understanding Baking Time for Different Textures
When it comes to baking chocolate chip cookies, the baking time significantly influences the final texture. Depending on your preference, you can achieve a variety of cookie textures by adjusting the time in the oven. For a classic cookie that’s crisp on the edges and chewy in the center, bake for about 10-12 minutes. Keep an eye on them; they should be golden around the edges but still soft in the middle when you take them out.
If you prefer more crunch and a firmer texture, extend the baking time to 12-15 minutes, but be cautious not to overbake. Overbaking can lead to dry cookies that lose their irresistible chewiness. Conversely, for cookies that are soft and doughy, you might want to take them out as soon as the edges start to set, even if they look slightly underbaked. They will continue to cook on the baking sheet as they cool, resulting in a soft and tender treat.
The Role of Parchment Paper vs. Silicone Mats
Choosing the right baking surface can make a noticeable difference in your cookie outcomes. Parchment paper is a go-to for many bakers, offering a non-stick surface that also helps in even baking. It absorbs some moisture, which can help in getting that desirable crispiness on the cookie edges while maintaining a soft center.
Silicone baking mats are another excellent option. They provide a reusable, non-stick surface that can be a bit more forgiving than parchment. Cookies baked on silicone mats tend to spread slightly less, which can be beneficial if you’re looking for thicker cookies. However, they may require a slightly longer baking time, so keep an eye on your cookies to ensure they don’t overbake.
Cooling Your Cookies: Best Practices for Texture Retention
Cooling your cookies properly is just as crucial as baking them. Once your cookies are out of the oven, transfer them to a wire rack after a couple of minutes. This allows air to circulate around them, preventing them from becoming soggy from steam trapped underneath. For the best texture retention, let them cool completely on the rack.
If you’re aiming for a cookie with a soft center, it’s crucial to catch them just as they start to firm up around the edges. For those who prefer a firmer texture, allowing them to cool longer will ensure they set completely. If you’re storing cookies, make sure they’re completely cooled to avoid them becoming mushy.
Common Mistakes to Avoid When Making Chocolate Chip Cookies
Overmixing the Dough: How It Affects Texture
One of the most common pitfalls in cookie baking is overmixing the dough. When you mix the flour into the wet ingredients, mix just until combined. Overmixing can develop gluten, leading to tough cookies instead of the tender, chewy treats you desire. Aim for a dough that’s slightly lumpy when you add in the chocolate chips, and don’t worry about achieving a perfectly smooth texture.
Incorrect Oven Temperature: The Impact on Baking
Accurate oven temperature is vital for successful cookie baking. An oven that’s too hot can result in burnt edges and undercooked centers, while an oven that’s too cool might lead to cookies that spread too much and lack texture. Always preheat your oven, and if you suspect your oven might be off, consider using an oven thermometer to ensure accuracy.
Using Expired Ingredients: How Freshness Affects Flavor
The freshness of your ingredients can drastically impact the flavor and texture of your cookies. Always check the expiration dates on your baking soda, baking powder, and flour. Using expired ingredients can lead to flat, bland cookies. Fresh ingredients ensure a better rise and a more pronounced flavor, so consider stocking up on essentials and replacing them regularly.
Storing and Freezing Your Chocolate Chip Cookies
Best Practices for Storing Cookies to Maintain Freshness
To keep your cookies fresh and delicious, store them in an airtight container at room temperature. If you prefer a crispy cookie, place a piece of bread in the container with them; this helps absorb moisture. For softer cookies, store them without the bread. Remember, cookies can last for about a week at room temperature but can also be frozen for longer storage.
How to Freeze Cookie Dough for Future Baking
Freezing cookie dough is a fantastic way to always have fresh cookies at your fingertips. Portion the dough into balls and place them on a baking sheet to freeze individually. Once frozen solid, transfer them to a zip-top bag or airtight container, labeling it with the date. You can bake the frozen dough directly from the freezer, adding an extra minute or two to the baking time.
Reheating Tips for Enjoying Cookies Later
If you find yourself with leftover cookies, reheating them properly is crucial for restoring their original texture. Preheat your oven to 350°F (175°C), place the cookies on a baking sheet, and warm them for about 5-10 minutes, or until they’re heated through. This will revive their softness and make them taste freshly baked again.
Creative Variations of Chocolate Chip Cookies
Unique Ingredient Swaps for Dietary Preferences
One of the joys of baking is the ability to customize recipes to suit dietary needs. For a healthier twist, consider swapping half of the all-purpose flour with whole wheat flour. This not only adds a nutty flavor but also increases the fiber content. Alternatively, you can use almond flour for a gluten-free option that offers a unique texture and taste.
Gluten-Free Options: Flours to Use
If you’re baking for someone who needs to avoid gluten, there are several flours you can use. Almond flour is a popular choice, offering a rich flavor and moist texture. Coconut flour is another option, but it absorbs more liquid, so you’ll need to adjust the wet ingredients accordingly. Be sure to use a gluten-free baking mix that includes xanthan gum if you want a classic texture.
Vegan Alternatives: Egg and Dairy Substitutes
For a vegan version of chocolate chip cookies, replace eggs with flaxseed meal or applesauce. To make a flax egg, mix one tablespoon of flaxseed meal with two and a half tablespoons of water and let it sit for a few minutes until it thickens. For dairy, use plant-based butter or coconut oil, and swap regular chocolate chips for dairy-free varieties.
Flavor Enhancements: Adding Spices or Extracts
To elevate the flavor profile of your cookies, consider adding spices such as cinnamon or nutmeg or a splash of almond or vanilla extract. These ingredients can transform your standard chocolate chip cookie into a delightful twist that tantalizes the taste buds.
Fun Mix-Ins: Dried Fruits, Candies, or Flavored Chips
Don’t hesitate to get creative with mix-ins! Add dried fruits like cranberries or cherries for a chewy texture. Experiment with different types of chocolate chips, such as dark chocolate, white chocolate, or even peanut butter chips. You can also toss in nuts for added crunch or sprinkle in some sea salt before baking for a sweet and salty finish.
Pairing Chocolate Chip Cookies with Beverages
Classic Pairings: Milk and Coffee
The timeless pairing of chocolate chip cookies and milk is a classic for good reason. The rich, creamy texture of milk complements the sweetness of the cookies beautifully. For coffee lovers, a warm cup of brewed coffee can enhance the deep flavors of chocolate while providing a delightful contrast to the sweetness.
Creative Pairings: Tea, Dessert Wines, or Craft Beers
For a more adventurous pairing, consider serving your cookies with tea. A chai latte or Earl Grey can bring out the warm spices in your cookies. If you enjoy dessert wines, a sweet Riesling or a rich port can also complement the chocolate beautifully. Craft beers, especially stouts or porters, can create a unique flavor experience, enhancing the chocolate flavors in the cookies.
Seasonal Pairings: Holiday Drinks That Complement Cookies
During the holiday season, consider pairing your chocolate chip cookies with festive drinks like mulled wine or spiced cider. The warm spices in these drinks will harmonize with the cookies, creating a cozy, comforting experience.
Conclusion
Baking chocolate chip cookies is more than just a recipe; it’s a joyful experience that brings friends and family together. The process of mixing ingredients, the anticipation as they bake, and the delightful aroma filling your home create lasting memories. I encourage you to experiment with different variations, whether it’s through ingredient swaps or creative pairings, to make the recipe your own.
The timelessness of chocolate chip cookies lies in their versatility and the simple pleasure they bring. Whether you stick to the classic version or venture into unique twists, these cookies are sure to delight. So gather your ingredients, preheat that oven, and enjoy the rewarding experience of baking and sharing your delicious creations!
